Rootin’-est Tootin’-est Cowboy in the Wild, Wild Cantina!

It’s no secret that Halloween is my favorite holiday. The candy, the decorations, the crisp fall weather… but mostly, the crafty possibility. I try to go all out on a costume every year, and 2015 did not disappoint.

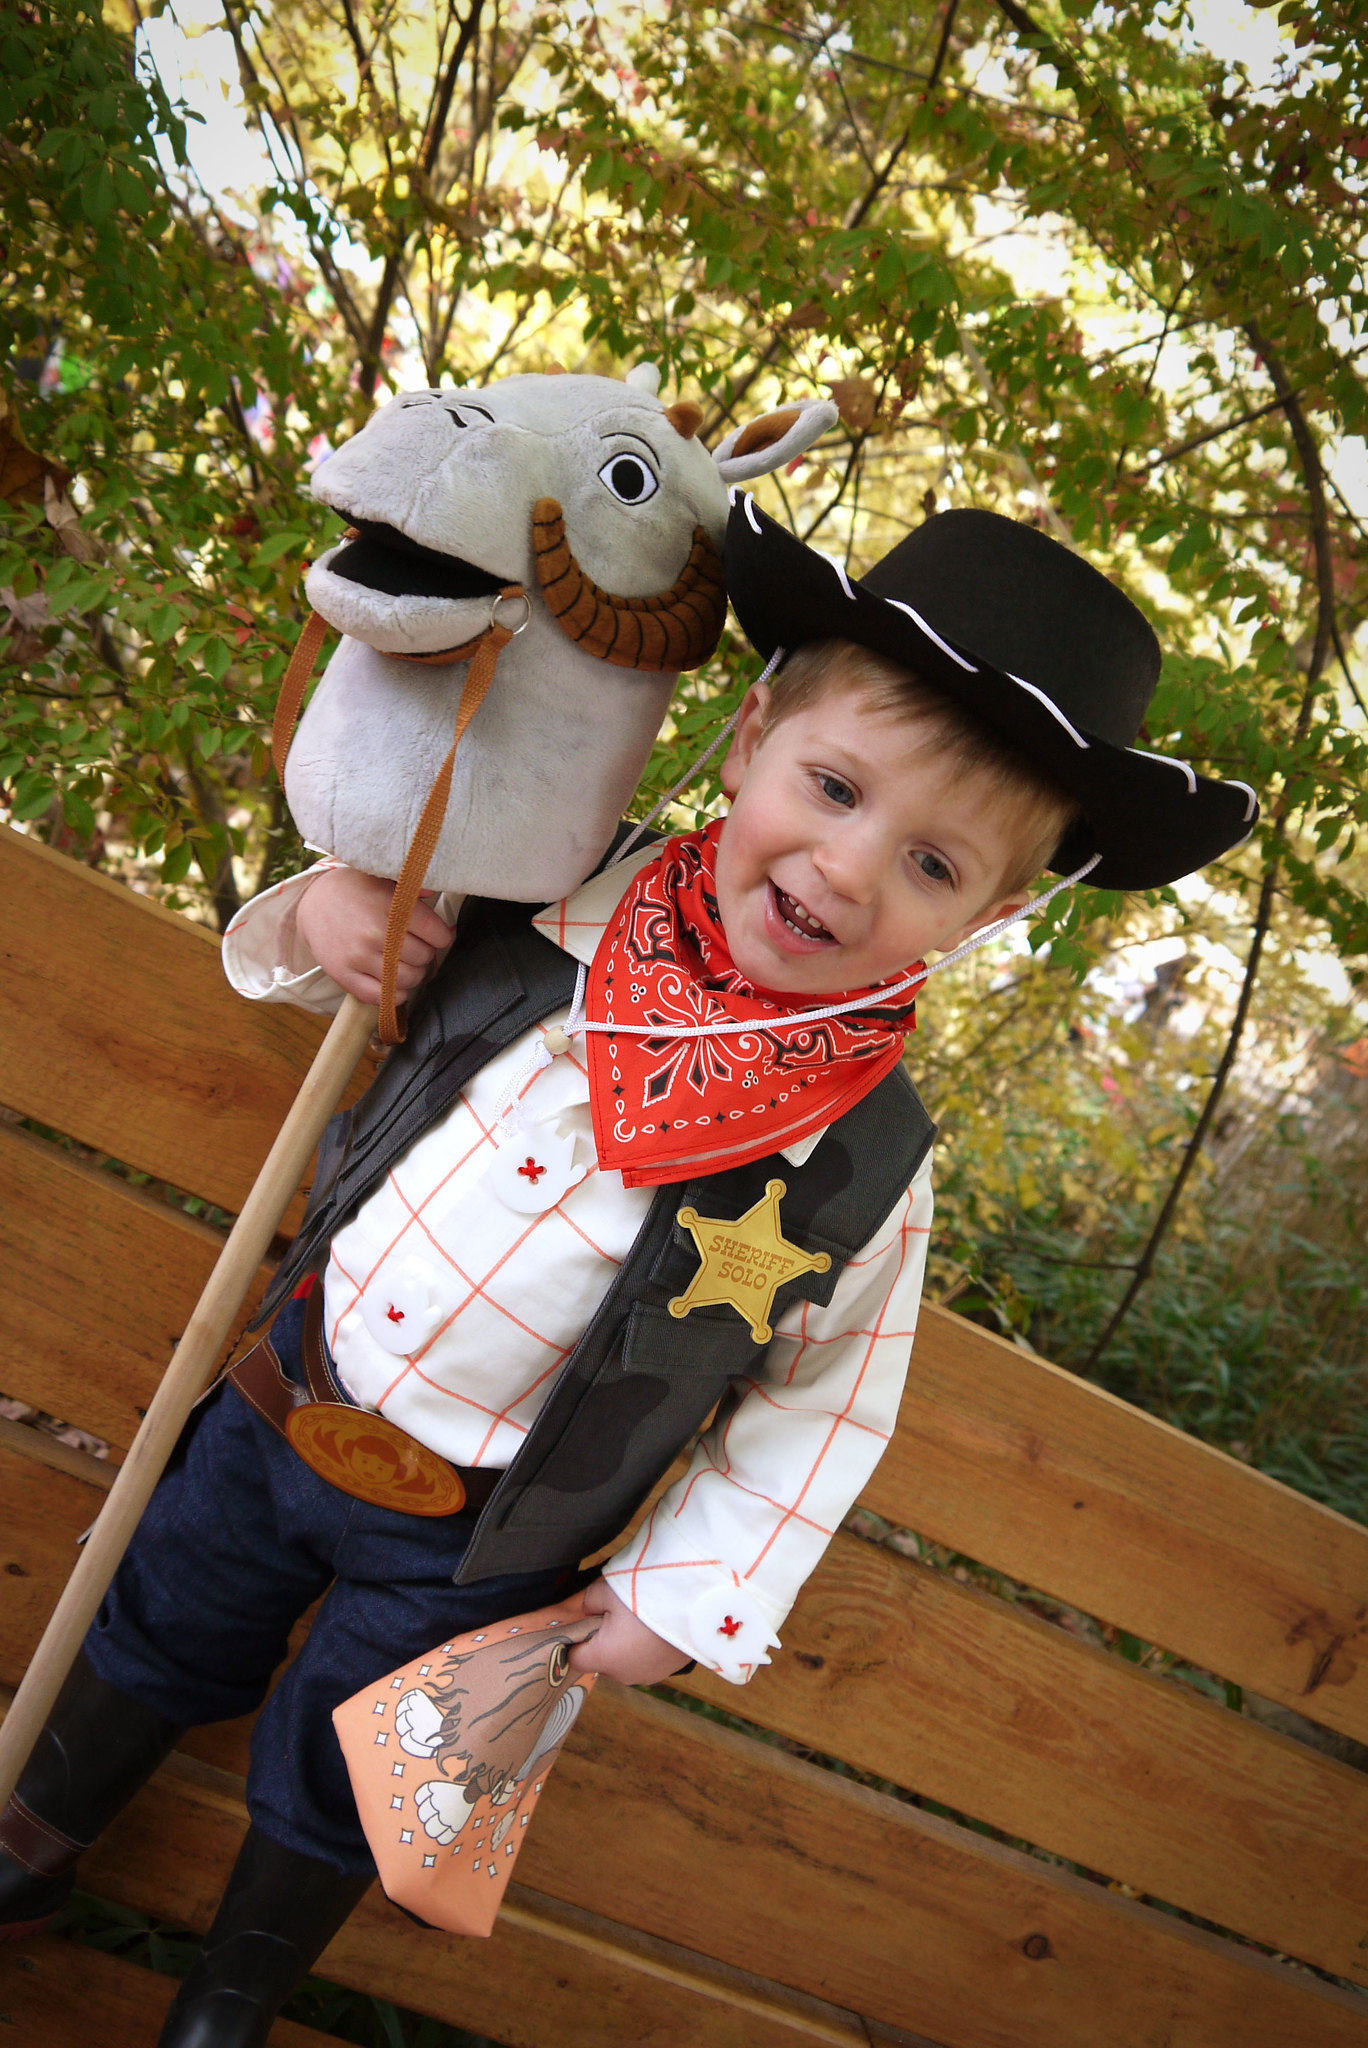
Now that my son is getting older, he was able to have input into his costume choice for the first time.  He couldn’t decide between Woody from Toy Story and Star Wars, so I tried to give him both. Introducing… Sheriff Woody Solo! I tried to blend elements from both characters together into the ultimate space cowboy.

Woody Solo Costume

Woody Solo Costume

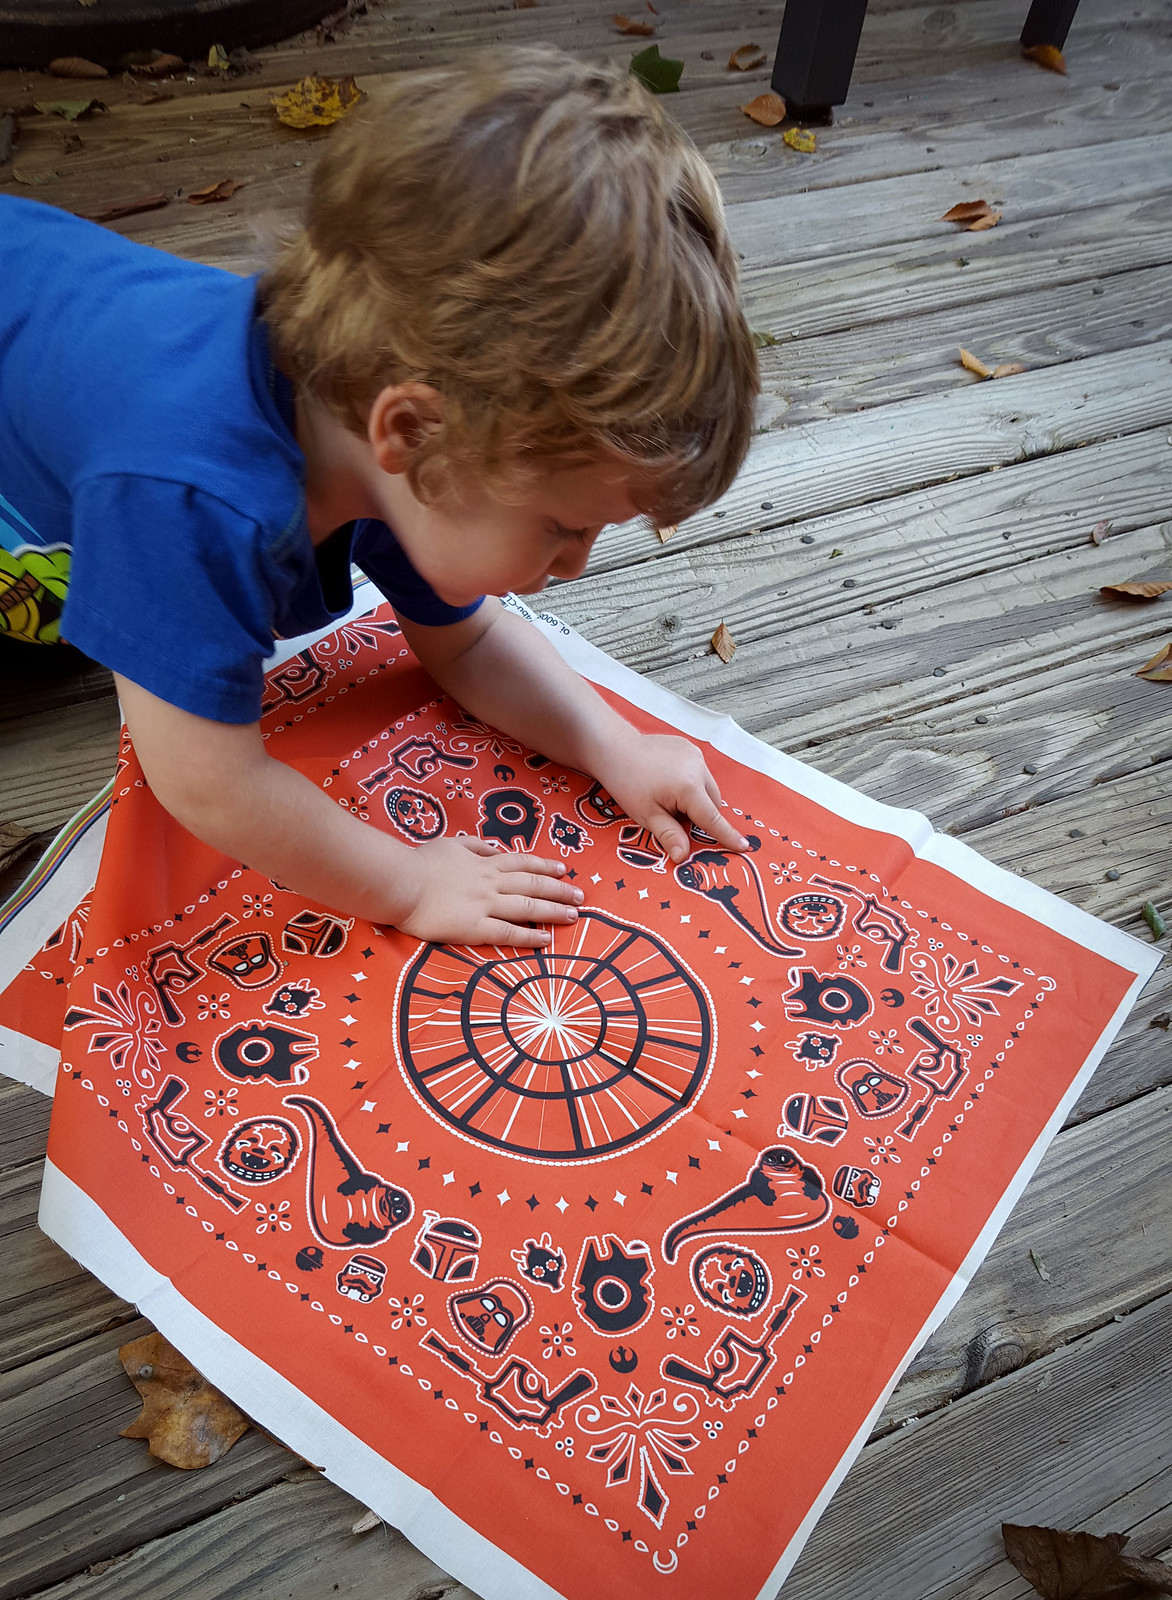
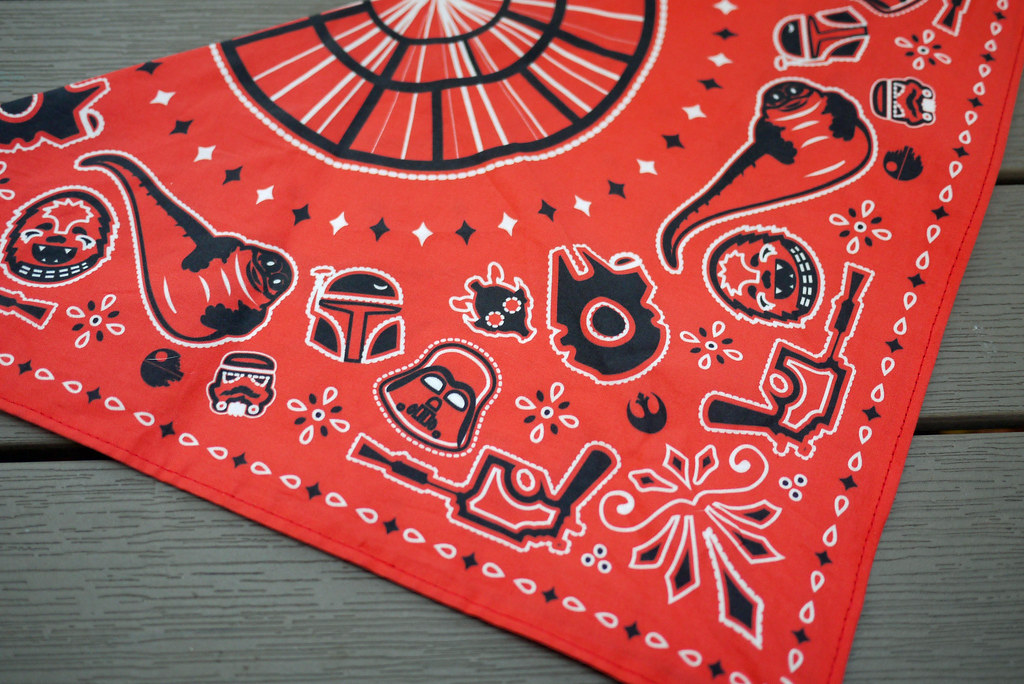
There are so many fun details in this costume, and I’ll try to touch on all of them. First was the bandana. Taking inspiration for a traditional red and white printed bandana, I set out to make a Star-Wars inspired version.

Woody Solo Costume in Progress: Bandana

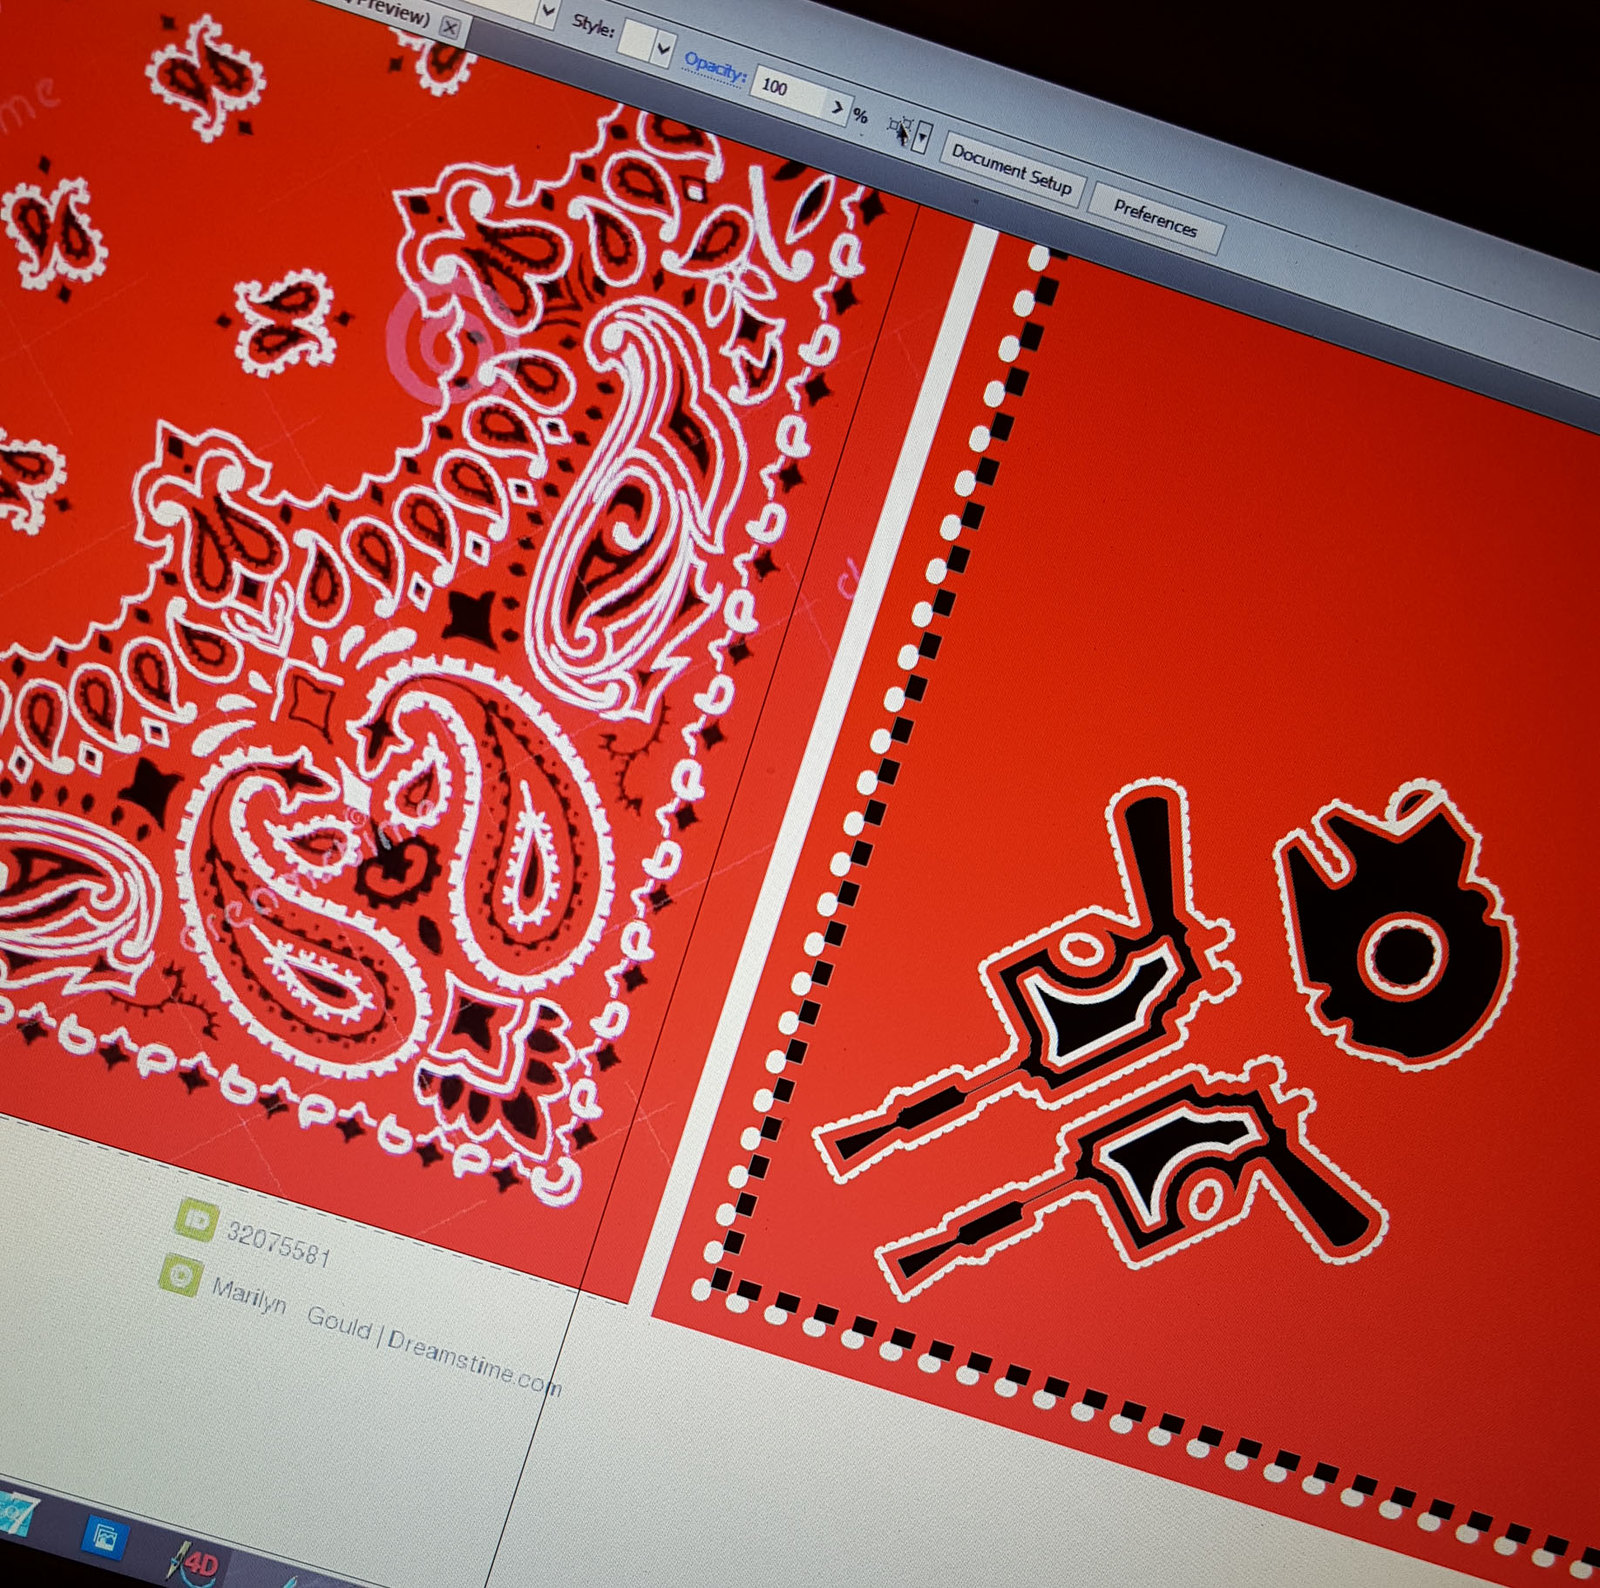
The final product turned out better than I could have hoped, especially considering my limited skills in AI. It went off to Spoonflower for printing.

Woody Solo Costume in Progress: Bandana

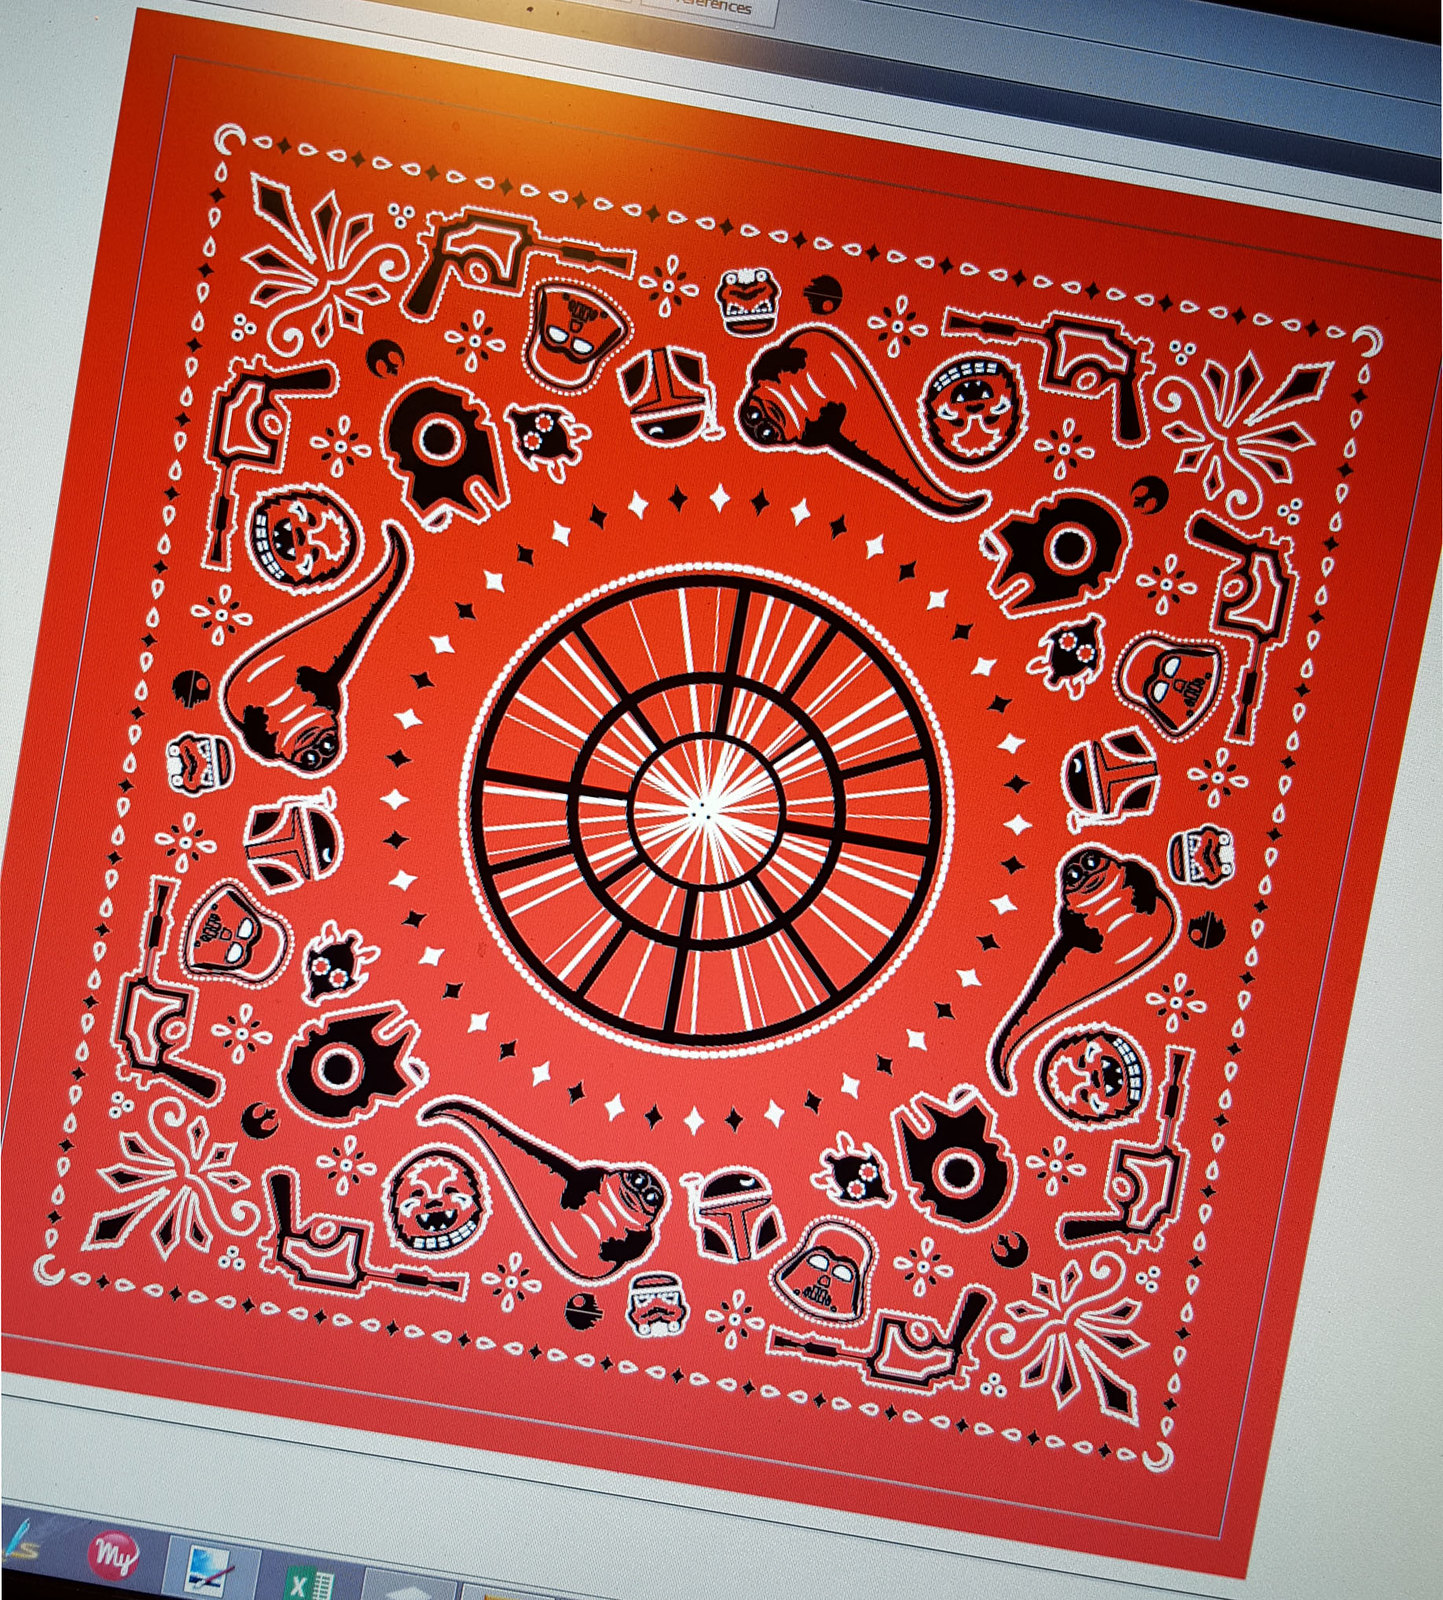
He loved finding all of the characters once it arrived. As always, I was very pleased with the print quality.

Woody Solo Costume in Progress: Bandana

A quick trim and hem and it was finished.

Woody Solo Costume

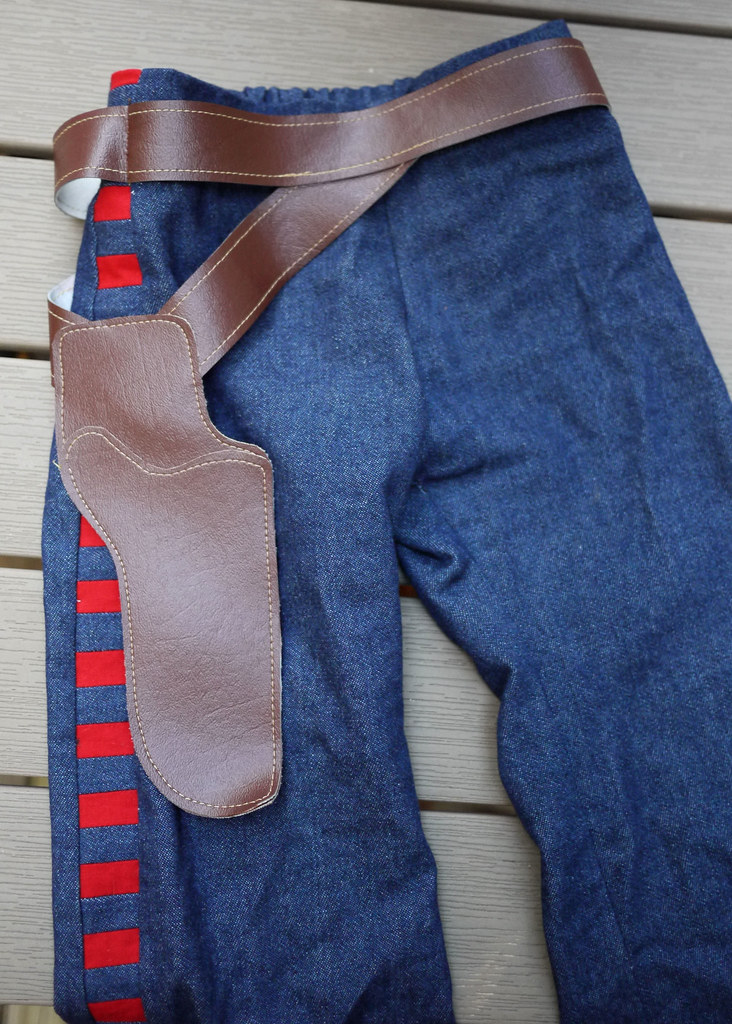
For the pants, I wanted to incorporate denim (Woody) and Corellian blood stripes (Han).

Woody Solo Costume in Progress: Pants

Woody Solo Costume in Progress: Pants

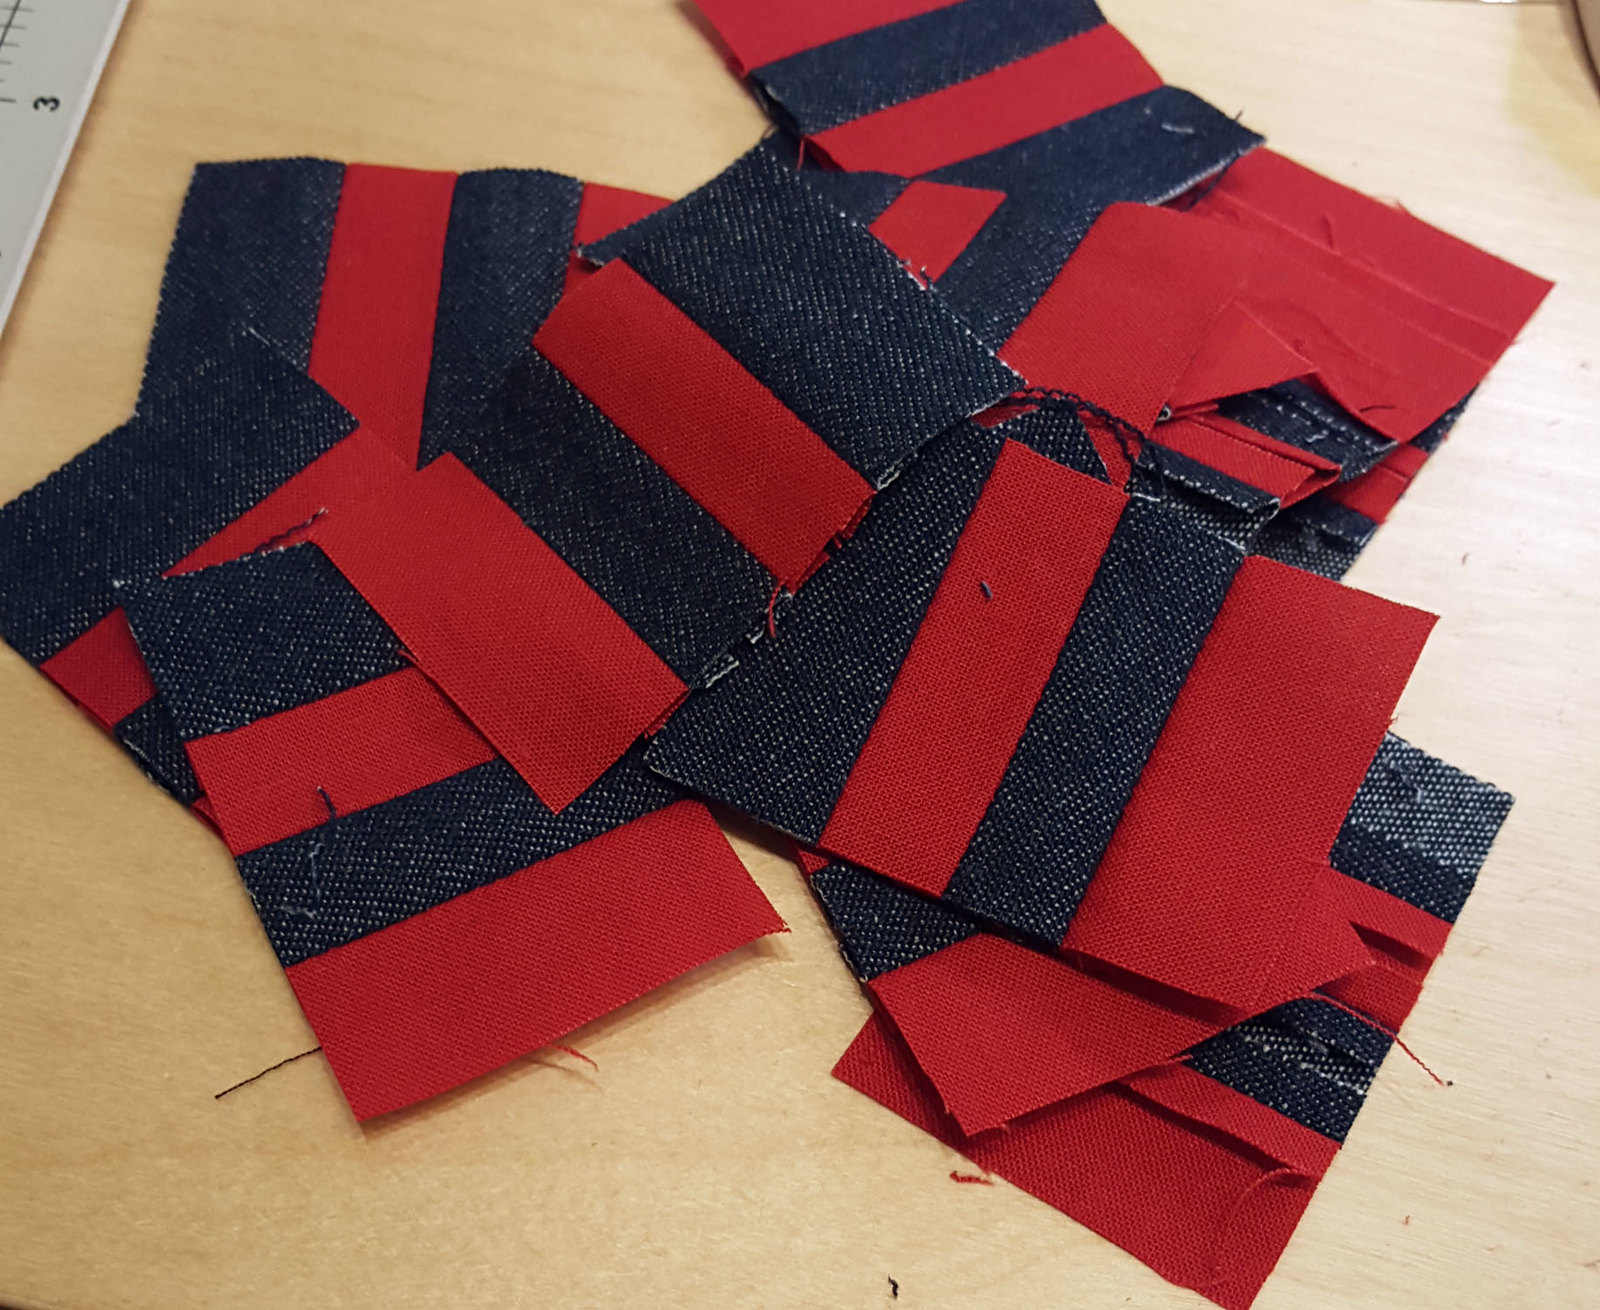
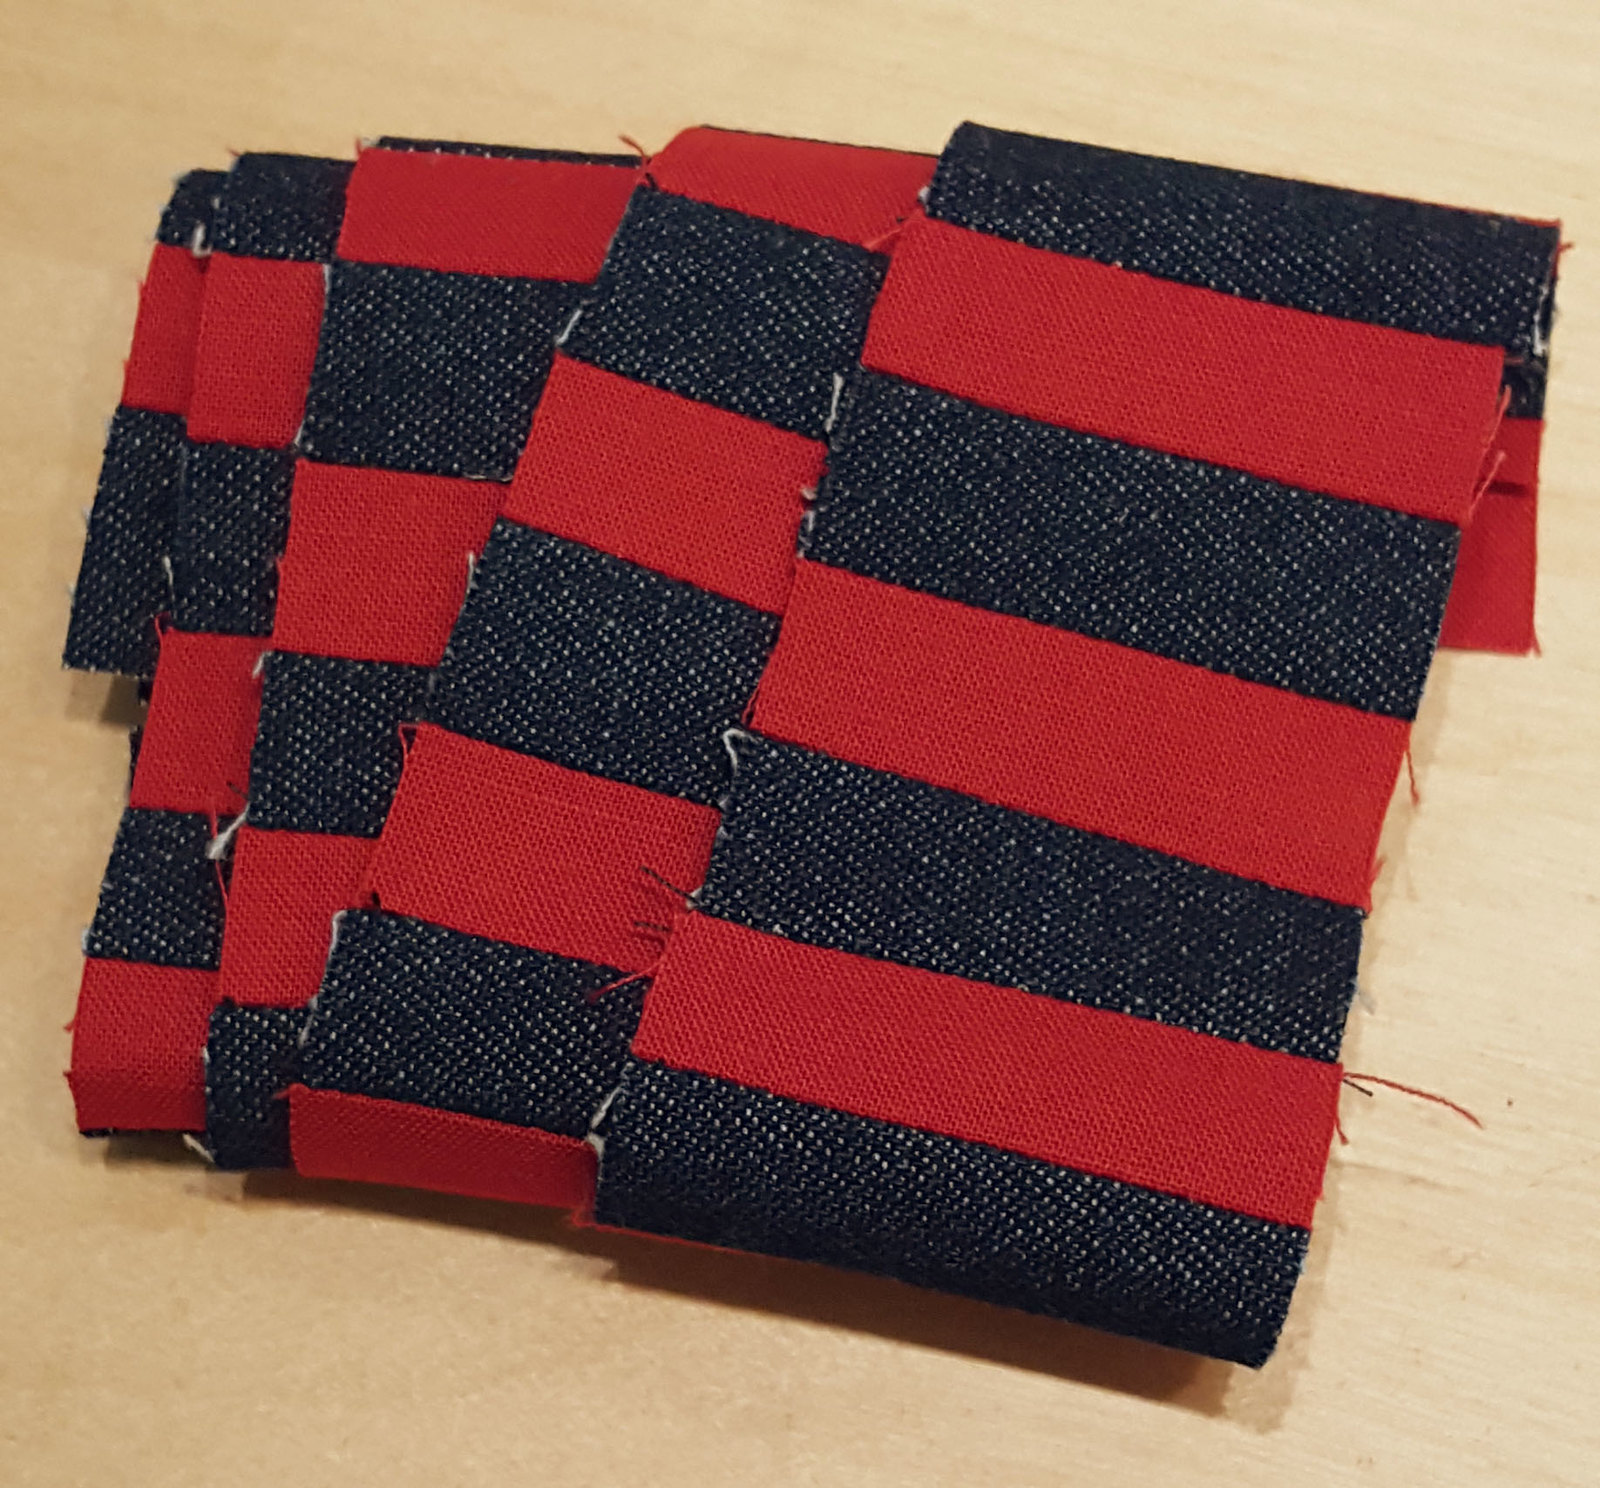
The pattern is free from Dana Made It – Kid Pants. I trimmed a bit off of each outer leg seam allowance to make room for a strip of stripes.

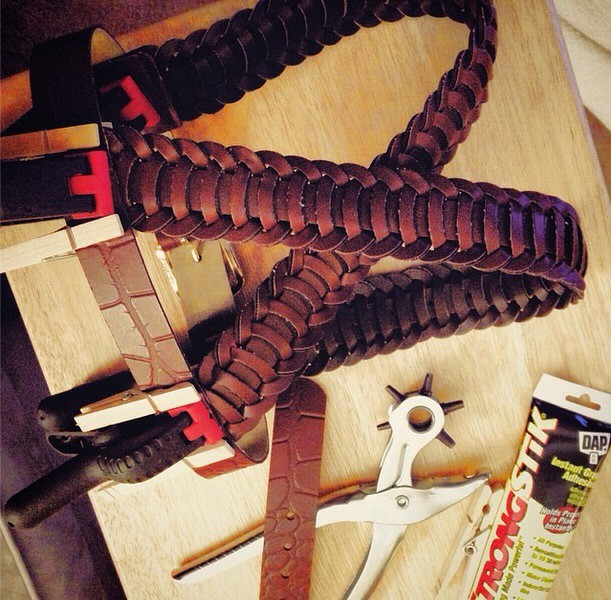
I used the flat front option. Scraps of topstitched vinyl were used for the belt and holster.

Woody Solo Costume

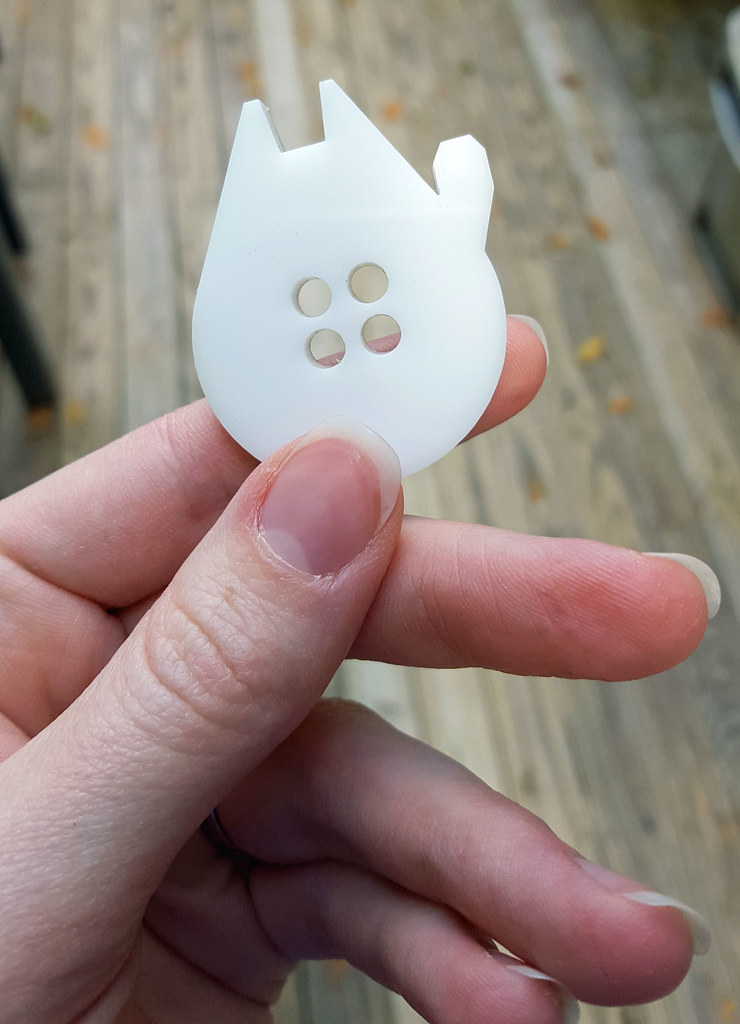
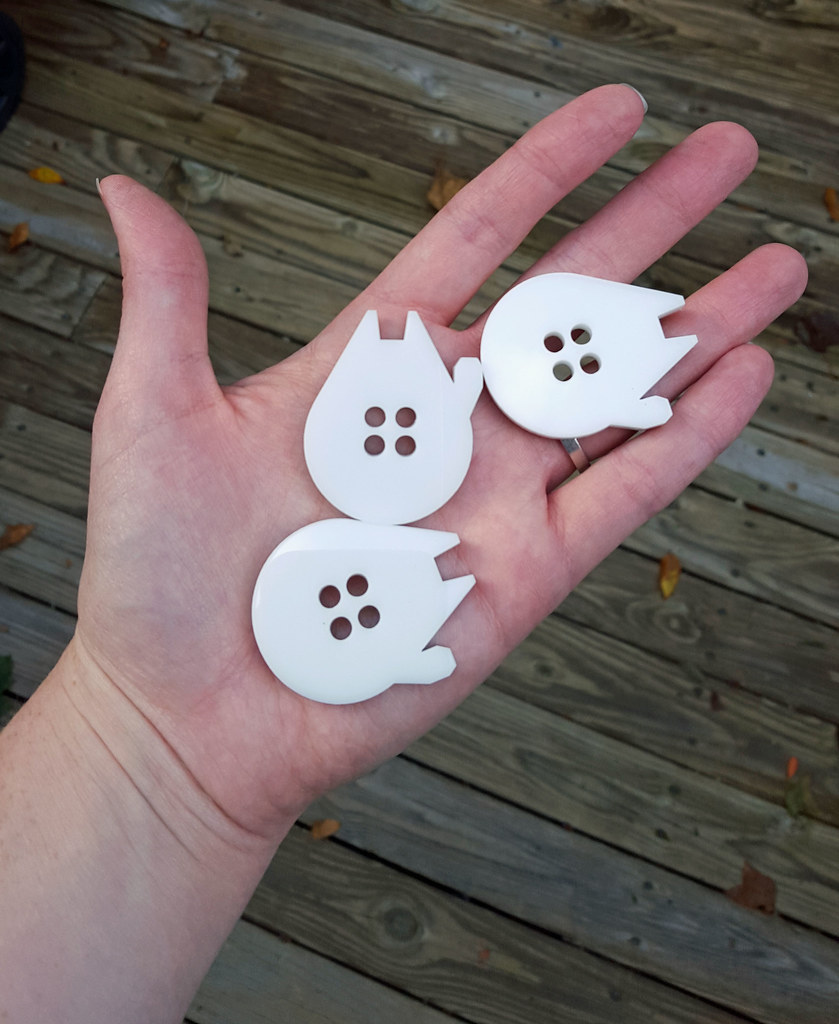
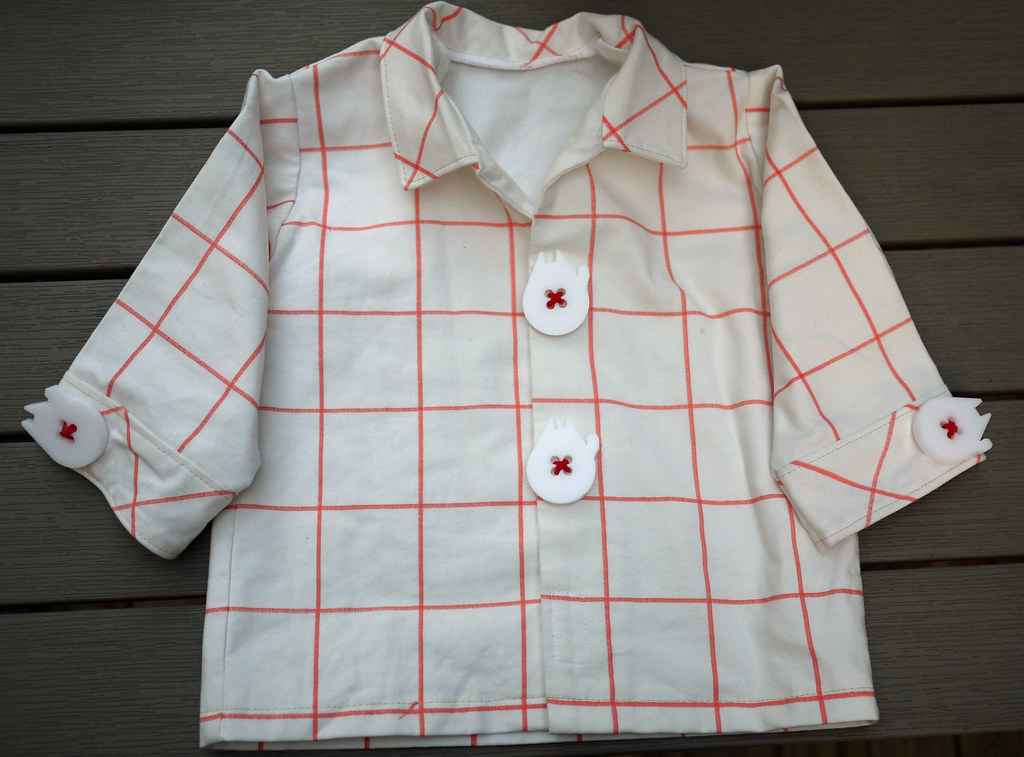
It’s tough, but if I had to pick my favorite part of this costume, it would probably be these Millenium Falcon buttons. I designed a very simple outline in Illustrator, and had them laser cut by Ponoko. Their service is so easy to use, even for a novice like myself. They make prototyping and pricing out options incredibly user friendly. I was able to get exactly what I wanted, within my budget, after a few small design tweaks. Their customer service is top notch, too! [No one is paying me to gush, I was just honestly impressed.]

Woody Solo Costume in Progress: Millennium Falcon Buttons

After making the costume, I still have four buttons left over. Any suggestions?

Woody Solo Costume in Progress: Millennium Falcon Buttons

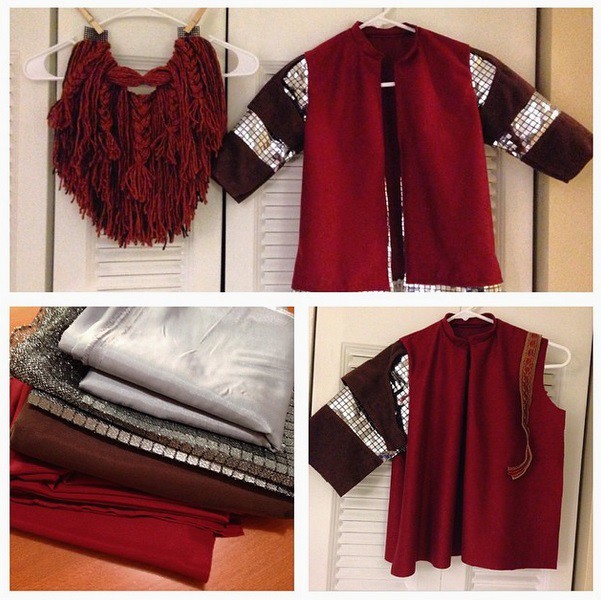
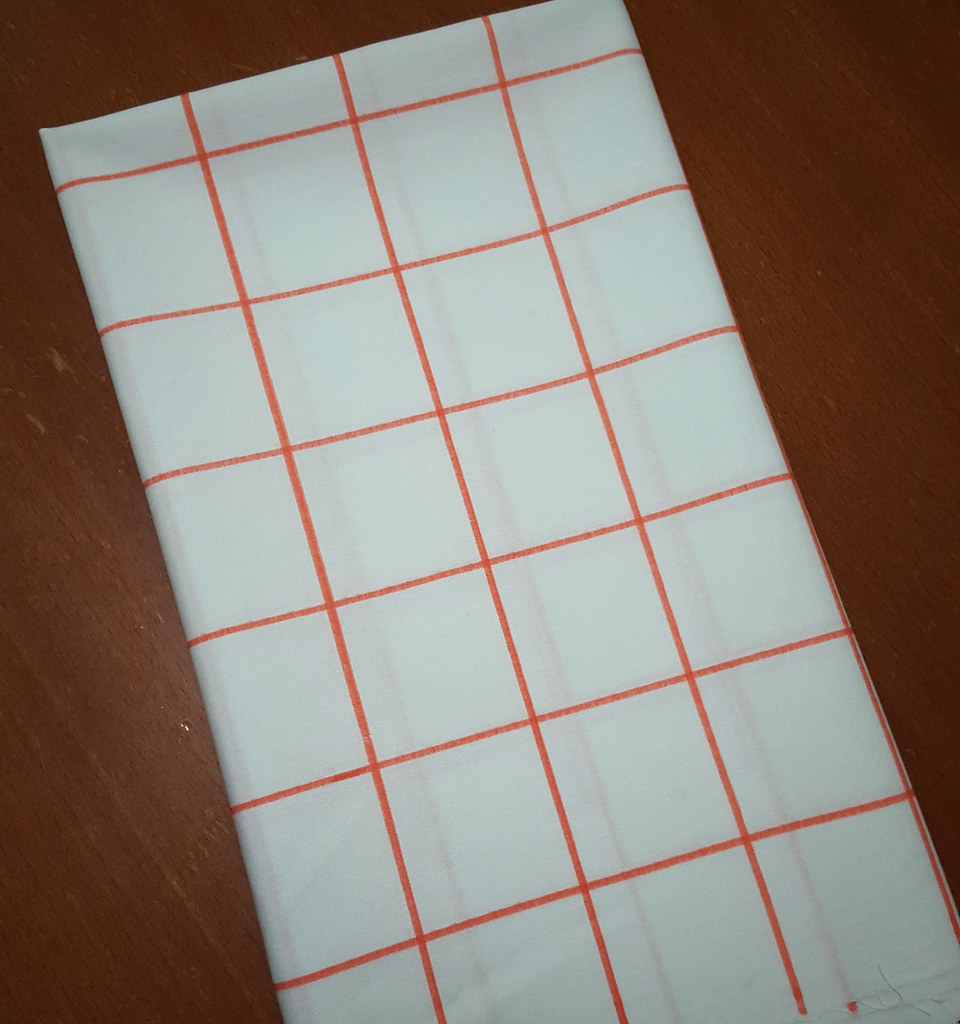
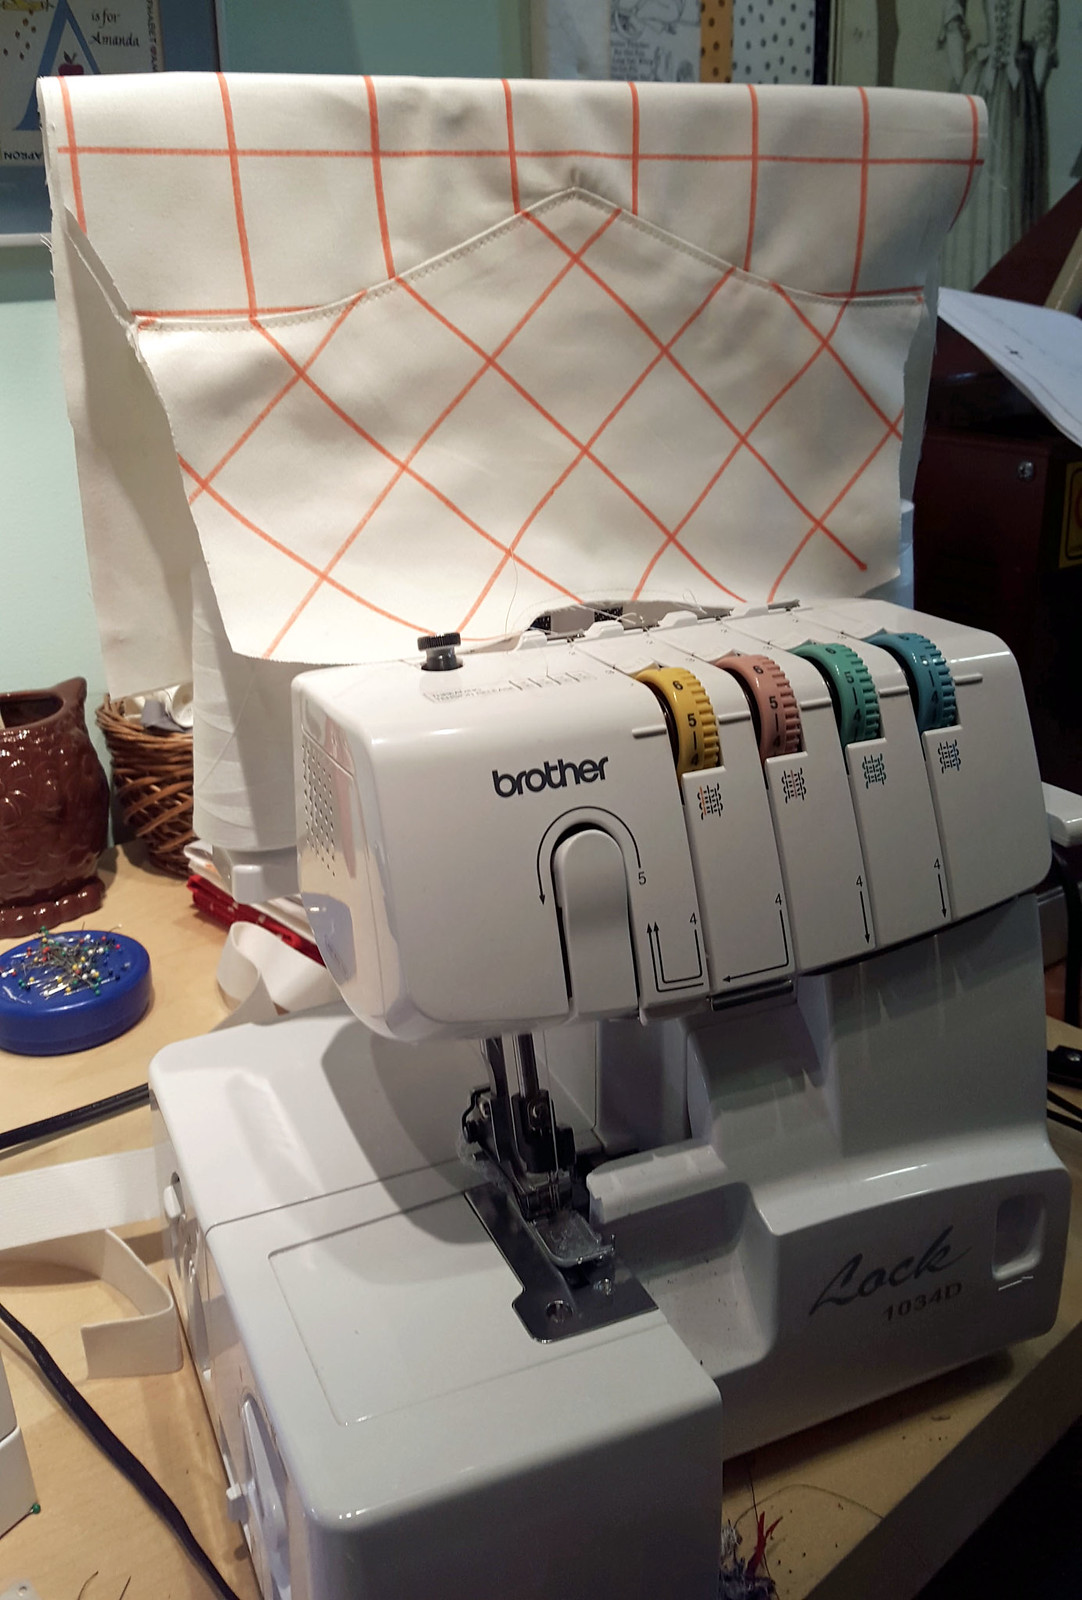
On to the shirt. It quickly became clear that I wasn’t going to be able to find the white and red checked fabric that I had in mind. Again, this is a mix — Woody’s shirt is yellow with red checks, and Han’s is white/off white. I improvised with white cotton and a red permanent fabric marker.

Woody Solo Costume in Progress: Shirt

Woody Solo Costume in Progress: Shirt

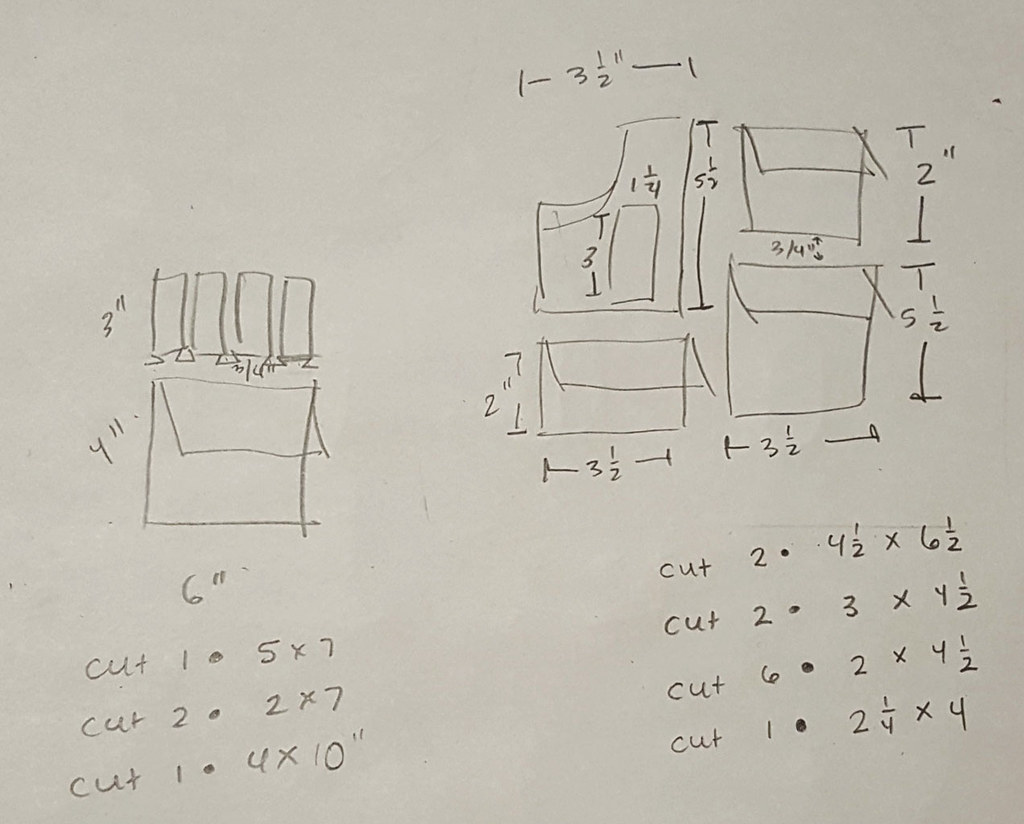
The pattern for this shirt is another freebie, Western Style Toddler Shirt from Barmy Beetroot. My modifications were a velcro closure, faux buttons, and lengthening the sleeves from short to long. I also cut the cuffs, collar, and back yoke on the bias.

Woody Solo Costume in Progress: Shirt

Woody Solo Costume

For the vest, I drew the structure from Han and the cow print from Woody. First, I sketched out the pocket placement from movie stills and figured out rough measurements.

Woody Solo Costume in Progress: Vest

The vest pattern was the free (surprise!) Very Cozy Vest from Made by Marzipan.

Woody Solo Costume in Progress: Vest

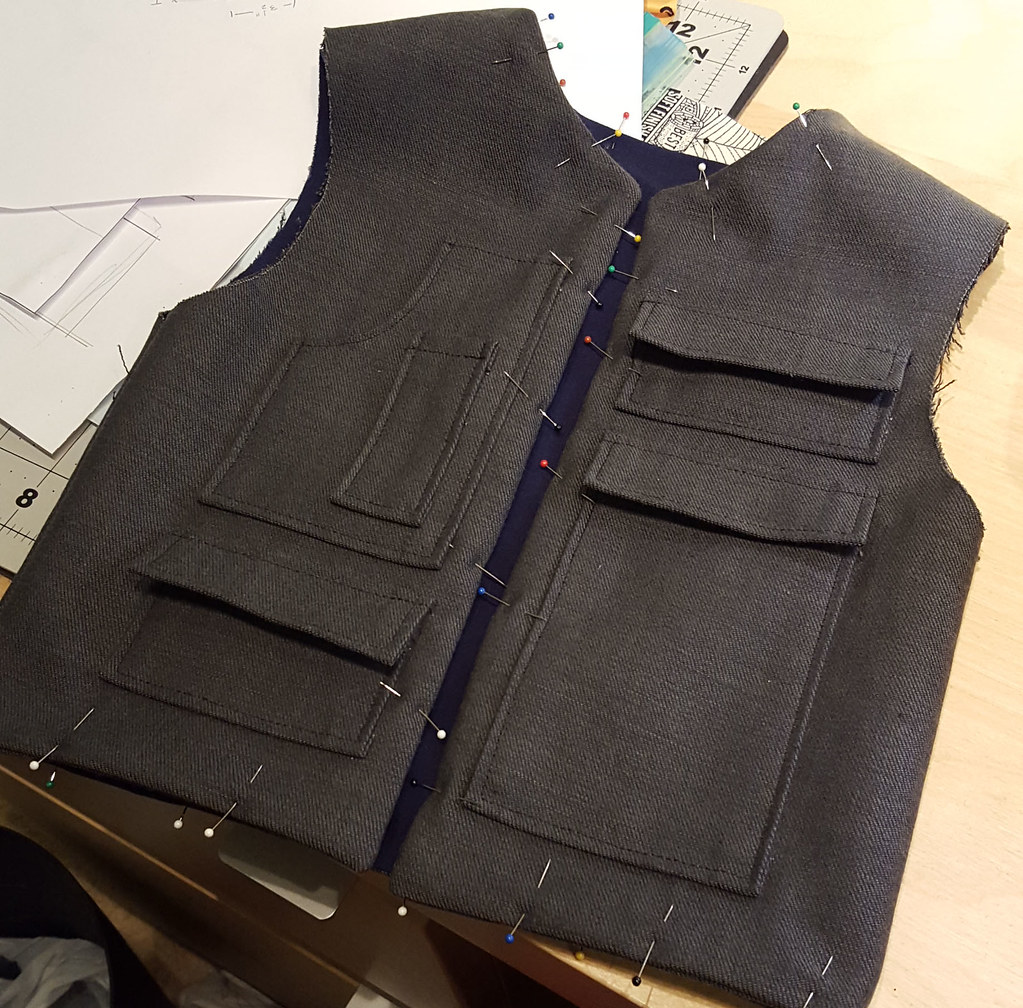
The cow print was freehanded with black Sharpie. Doesn’t get any easier than that! Woody Solo Costume

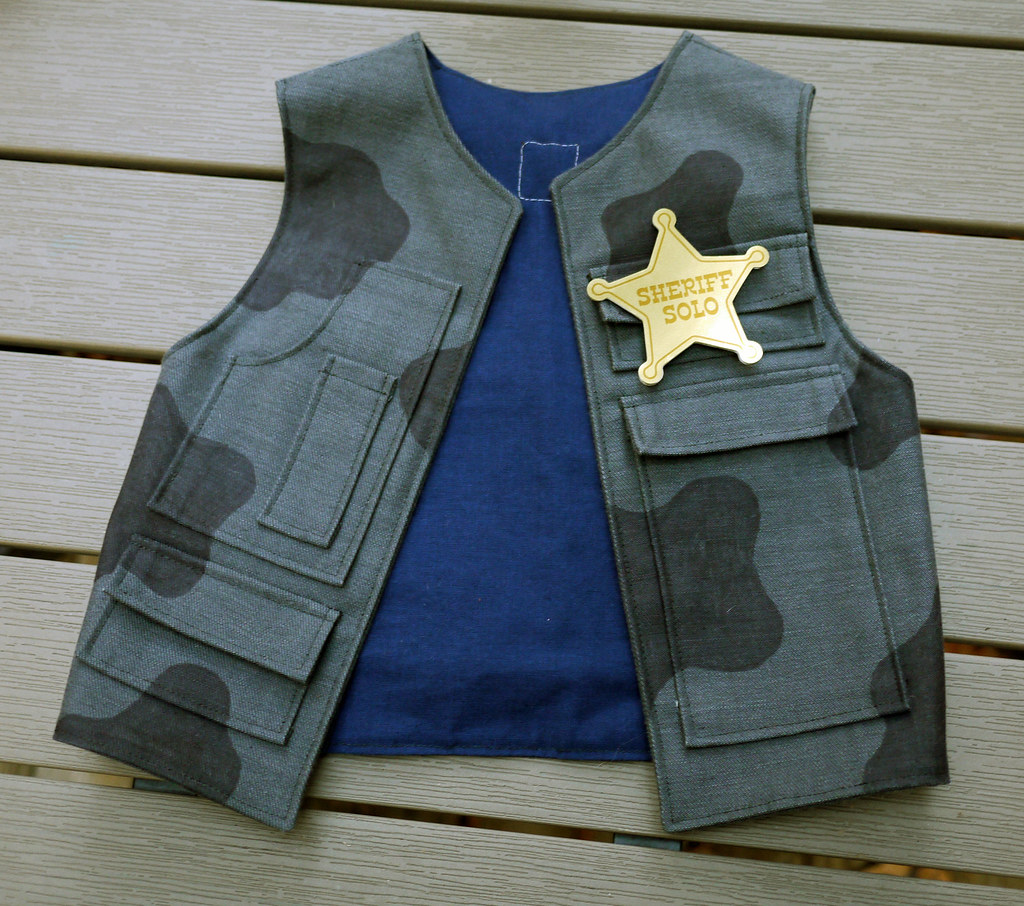
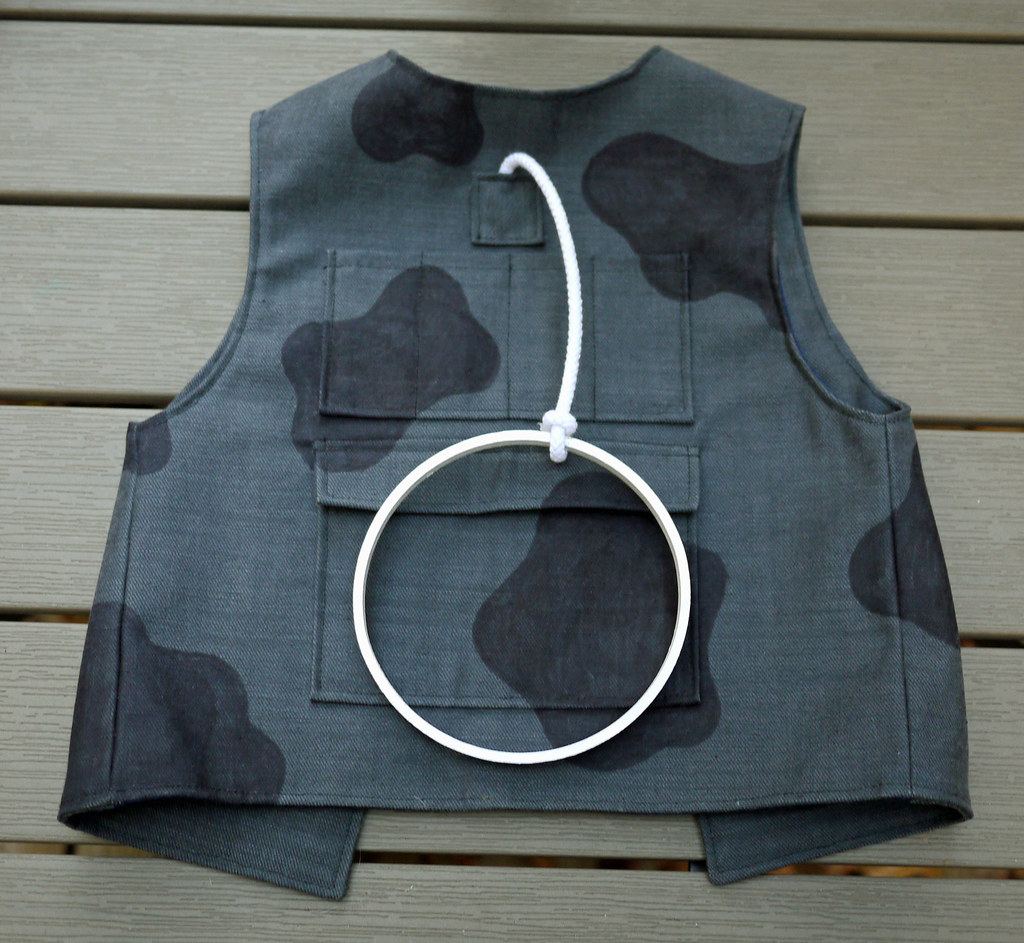
Another favorite detail — Woody’s pull string. A bit of cord from the fabric store coupled with a painted embroidery hoop innard.

Woody Solo Costume

Of course, I’ll take any excuse to use my Silhouette Cameo! The belt buckle, spurs, and badge were all designed with the Silhouette software. Each design was cut out of cereal box cardboard twice, then adhered together with my Xyron machine.

I then used the print & cut feature with Silhouette’s printable & adhesive gold foil. Layered al together, it made for sturdy pieces. I used a metallic gold marker around the raw edges to cover up the white from the cardboard.

Woody Solo Costume in Progress: Accessories

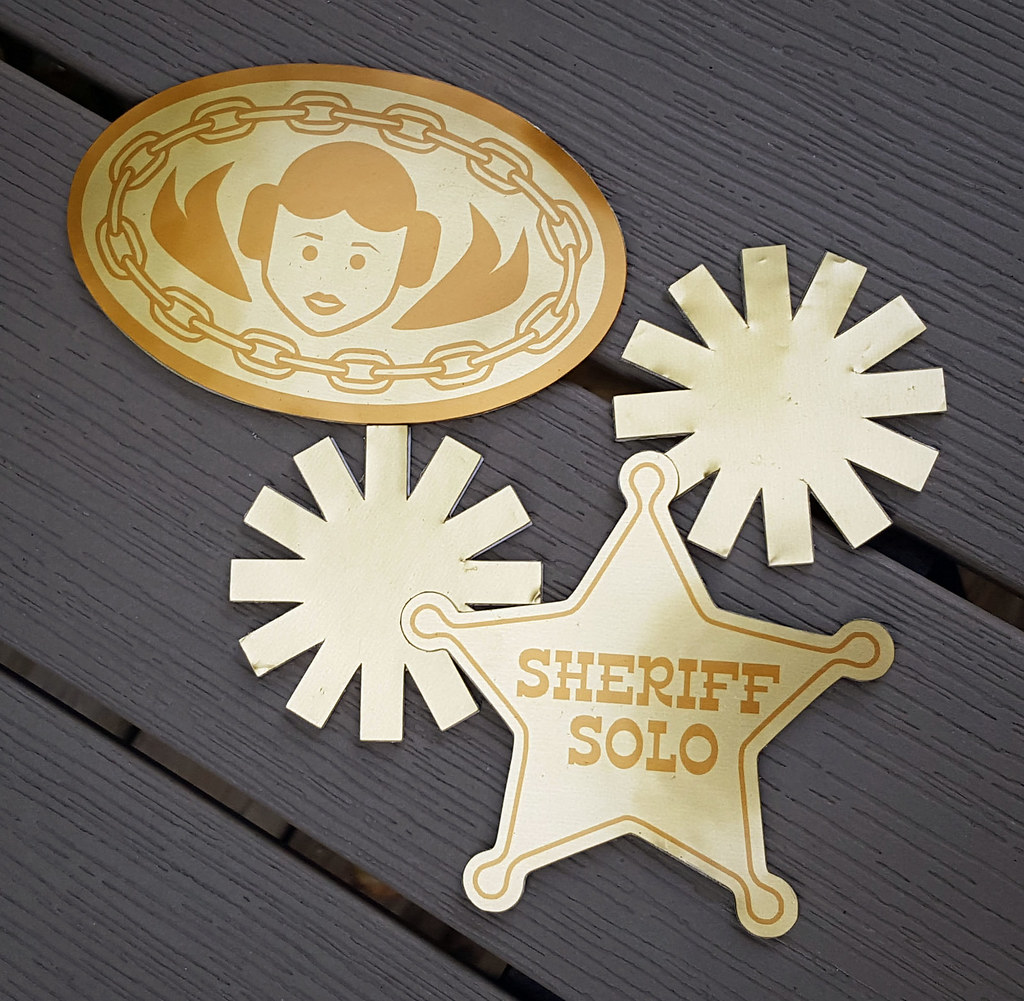
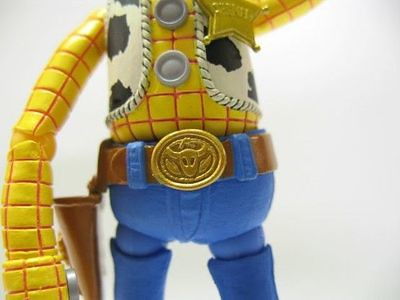
Here’s a screencap of Woody’s belt buckle, to show where I got my inspiration for the Leia buckle.

Woody's Belt Buckle

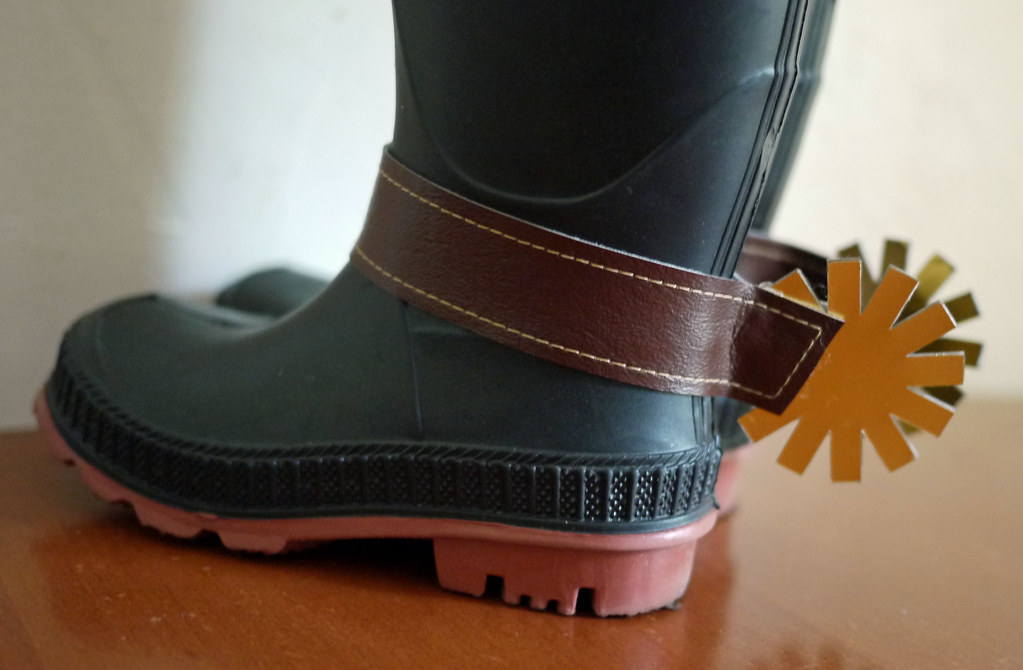
Originally I had attempted to make boot covers, but I couldn’t get them to look how I had pictured them. Instead, we picked up a cheap pair of black rain boots, which I decorated with strips of topstitched vinyl and the gold foil spurs.

Woody Solo Costume in Progress: Boots & Spurs

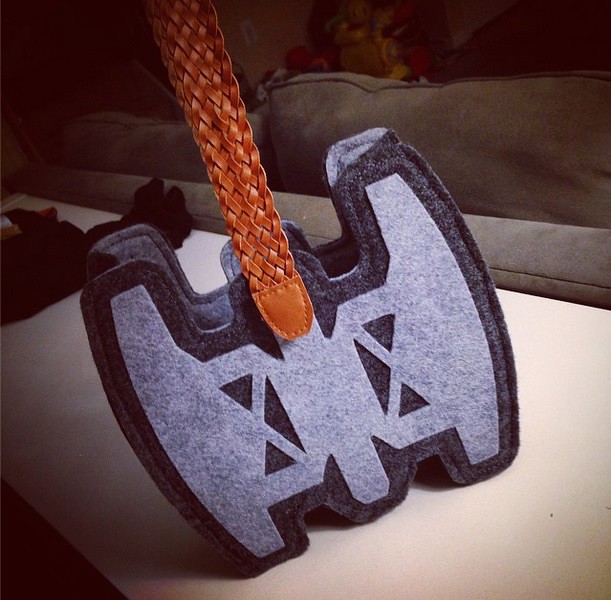
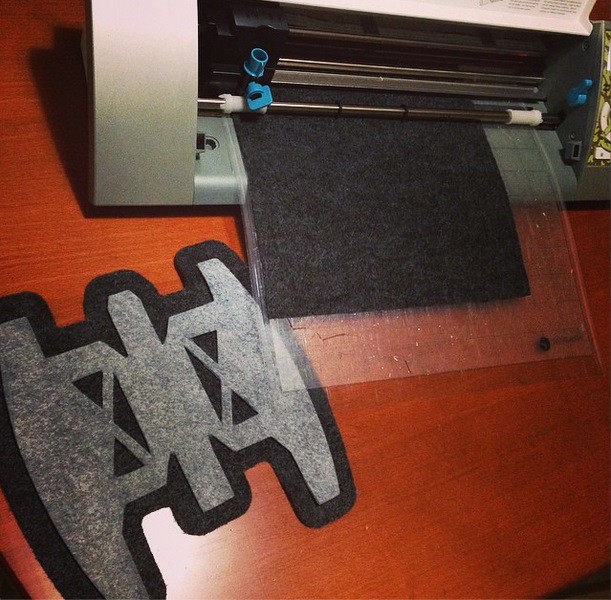
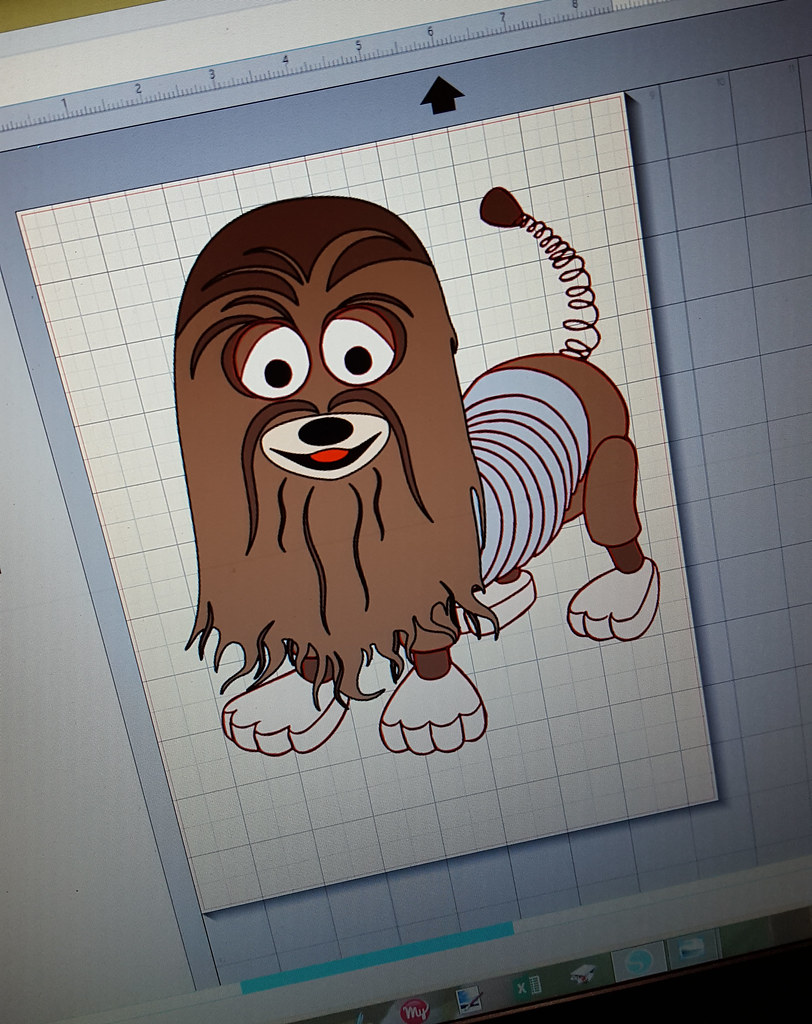
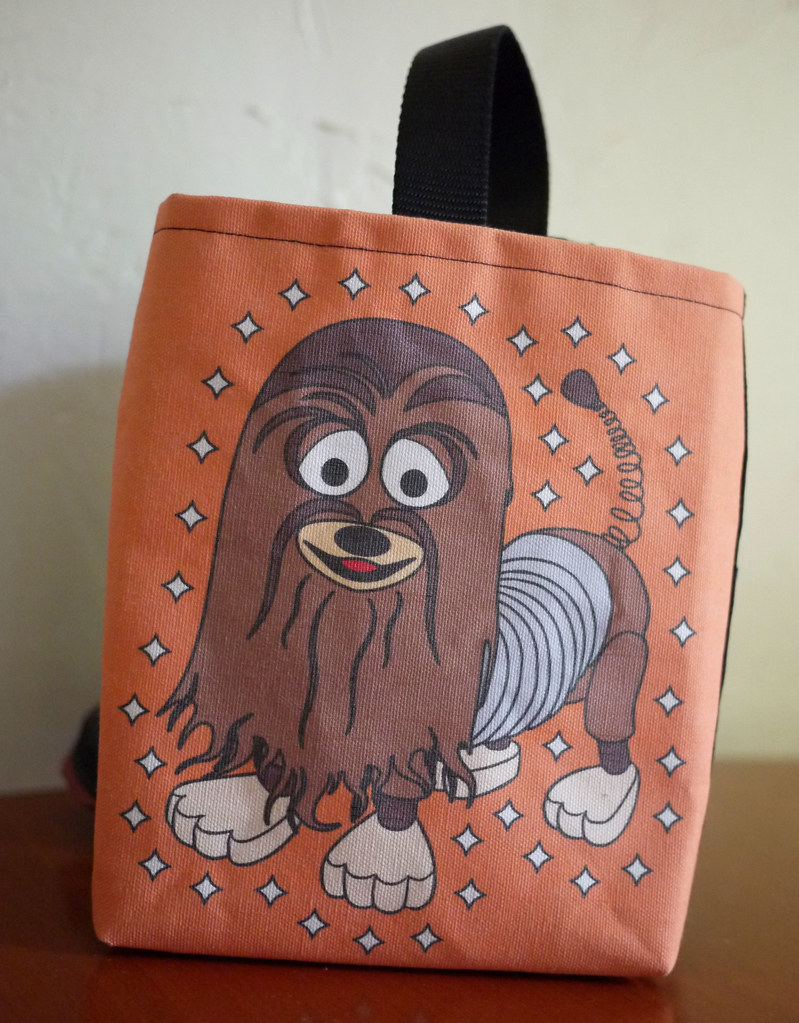
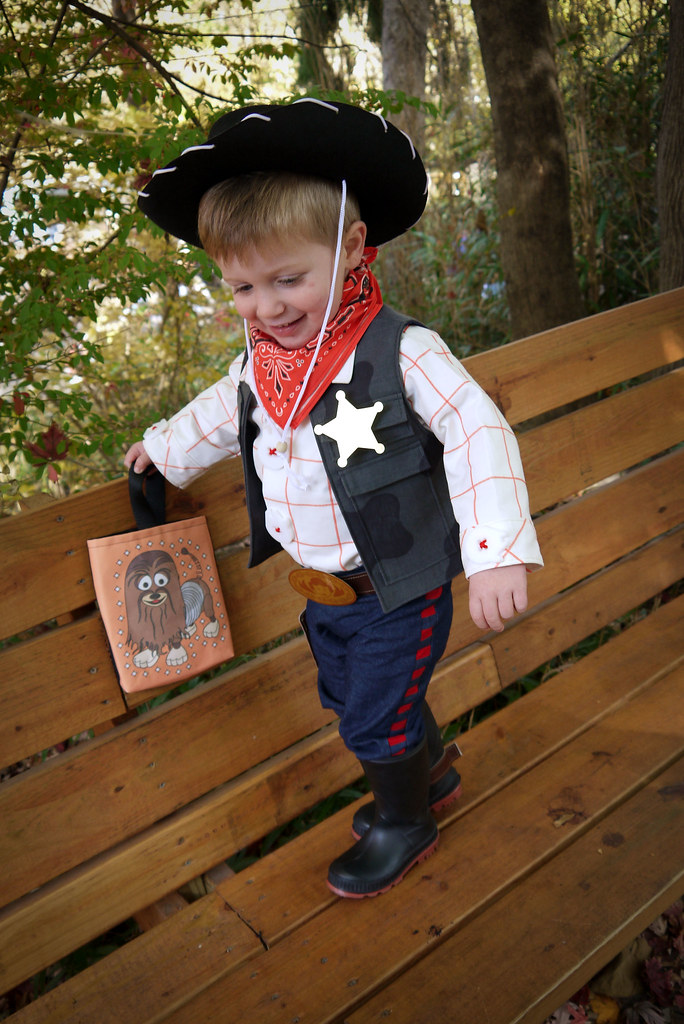
The finishing touch was the treat bag. I puzzled over it for a week or so, before settling on a mix of Woody’s pal and Han’s sidekick — Slink & Chewbacca. It took some time, but I came up with a design that I liked.

Woody Solo Costume in Progress: Slink/Chewbacca Treat Bag

The finished image was printed on Sillhouette’s printable canvas. It was a fast way to finish up, but I wish the colors had been a bit more saturated. It fit the bill, though, and was stuffed full of goodies on Halloween night.

Woody Solo Costume in Progress: Slink/Chewbacca Treat Bag
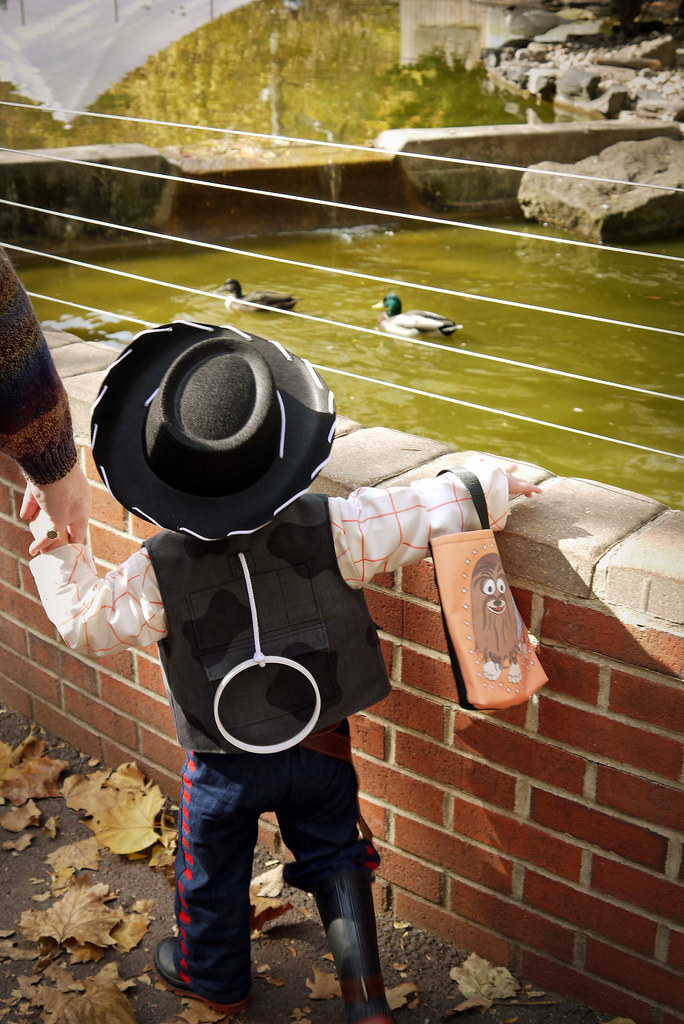
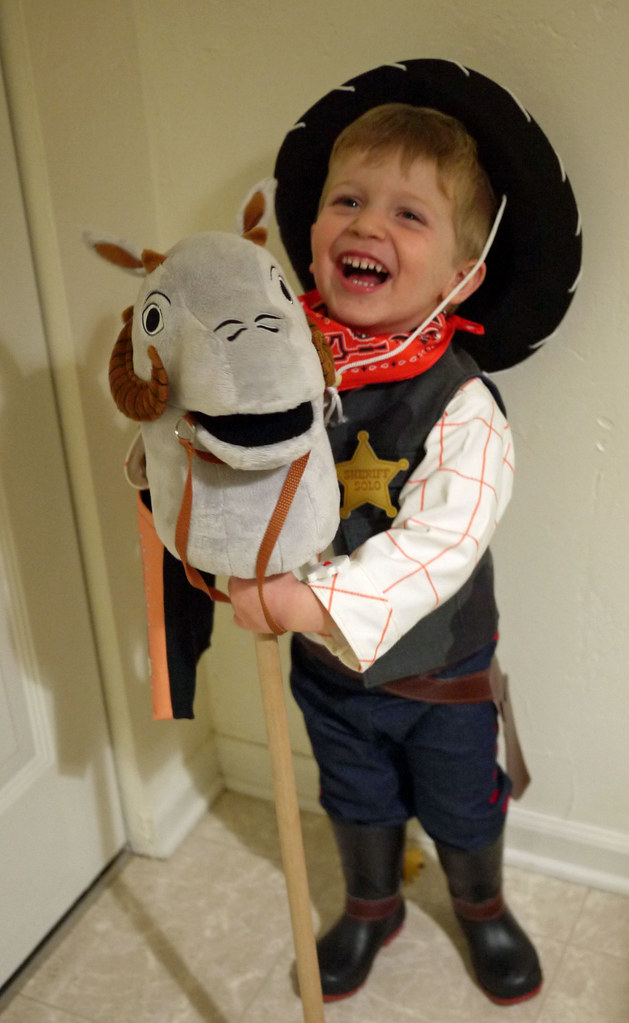
Here are a few more pictures of our cowboy enjoying his costume.

Woody Solo Costume

Woody Solo Costume Woody Solo Costume

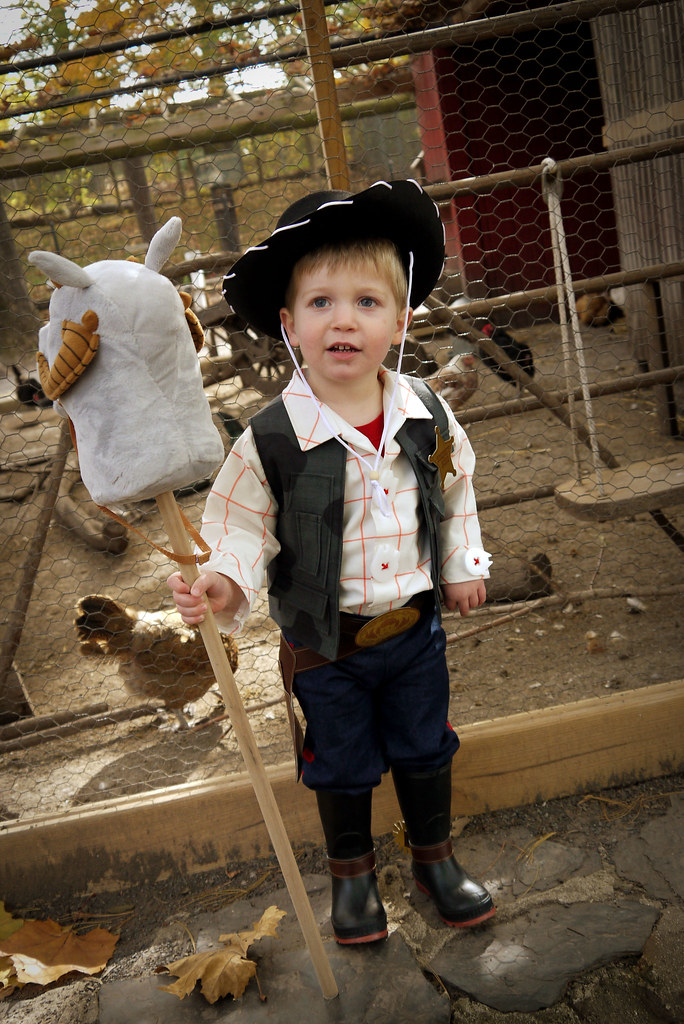
One final detail: the tauntaun hobby horse. Unfortunately it’s no longer available, as it was an exclusive from the 2012 Star Wars Celebration convention. I bought it back then to decorate our son’s nursery. It was great to incorporate it as part of his costume.

Woody Solo Costume

So another Halloween is on the books… and I’m already looking forward to next year!

Happy Housewarming

A visit to my younger sister’s new apartment required a quick housewarming gift. What to do? I used my new favorite crafting machine, the Silhouette Cameo, to put together some easy personalized gifts. And where better to start than with something I’d never tried before: glass etching.

Kitchen Towels and Pie Dish Housewarming Gift

The final project wasn’t perfect (you can ignore the two errant marks from some excess etching cream), but I feel even more confident to try this again. With a bit of care, it’s surprisingly easy to etch glass at home.

First, I came up with a simple text design and cut it out with my Cameo on scrap outdoor vinyl.

You’ll need gloves, goggles, etching cream, and something to apply the cream — I used a popsicle stick. Don’t skimp on the safety gear. This is icky stuff. Work outside if you can, like I did.

Kitchen Towels and Pie Dish Housewarming Gift

To prepare the pan for the cream, I cleaned it carefully with rubbing alcohol. I used my favorite transfer tape substitute — clear contact paper — to center the stencil on the pie pan.

Kitchen Towels and Pie Dish Housewarming Gift

Then it’s just a matter of carefully covering all of the exposed areas with etching cream. One thing I would recommend would be to cover more of the area outside the stencil. I managed to transfer some of the cream on my gloves outside of the stencil, which could have been avoided. Lessons for next time!

I doubled the etching time recommended on the bottle to get a good, deep etch. Pro tip — the etching goop is re-useable! I scraped what I could back into the bottle, then carefully rinsed off the rest in the sink. Pulling off the vinyl revealed a perfect etch.

Kitchen Towels and Pie Dish Housewarming Gift

To round out the gift, I used my Cameo again, this time loaded with black heat transfer vinyl, to decorate a pair of kitchen towels.

Kitchen Towels and Pie Dish Housewarming Gift

All wrapped up and ready to go, it made for a nice little present.

Kitchen Towels and Pie Dish Housewarming Gift

Moo Baa La La La

Anyone with a kiddo has probably read ‘Barnyard Dance’ by Sandra Boynton once, twice, or maybe a million times. It’s one of the perennial favorites at our house, so a farm animal quilt was definitely in order.

Laurie Wisbrun Counting Animals Baby Quilt

The ten main panels (nine on the front, one on the back) are from Laurie Wisbrun’s Barnyard Counting collection for Robert Kauffman. The remaining fabrics are all calicos from the local big-box fabric store.

Laurie Wisbrun Counting Animals Baby Quilt

I love personalizing quilts with the recipient’s name, so I cut out letters from leftover fabric, then fused and appliqued them on.

Laurie Wisbrun Counting Animals Baby Quilt

I found the perfect angled stripe for the binding already living in my fabric stash. It was made to be!

Laurie Wisbrun Counting Animals Baby Quilt

Moo.

Laurie Wisbrun Counting Animals Baby Quilt

See Ya Later Alligator Easter Basket

When looking for an Easter basket last year, it struck me that there weren’t many options for boys. That might be a bit of a mischaracterization — there were LOTS of baskets, if you were looking for Spiderman’s head or Captain America’s shield or something sports related. (Not casting aspersions at superheroes — I’m a big fan!) But I couldn’t find anything that was cute, without being frilly and obviously intended for the princess set. It took very little effort to DIY something sweet and personalized.

Elliott's Gator-y Easter Basket

Here’s the before — nothing wrong with it, just lacking a bit of imagination.

Elliott's Gator-y Easter Basket, Before

The cute alligator print was from JoAnn Fabrics, as was the basket (40% off coupon!). I don’t have a big technical writeup for making the liner, because I just made a rough match of the liner that the basket came with. I did swap out the ruffles for basic pleats.

Elliott's Gator-y Easter Basket

Little ties to keep everything in place.

Elliott's Gator-y Easter Basket

And what kid doesn’t love having their name emblazoned on everything? I happened to have access to someone else’s embroidery machine at the time, but this could be done just as easily with letters cut out of felt, hand embroidery, or even iron-on letters that you can buy at the craft store.

Elliott's Gator-y Easter Basket

All ready for the Easter bunny!

Elliott's Gator-y Easter Basket

Wibbly Wobbly Tardis Quilt

What is the perfect gift for a Dr. Who lover? A Tardis quilt. Obviously.

Wibbly Wobbly Tardis Quilt

It was pure dumb luck that I stumbled on to the recently released line of Dr. Who prints at Joann Fabrics right as I was looking for a backing. These daleks did the trick!

Wibbly Wobbly Tardis Quilt

Wibbly Wobbly Tardis Quilt

Pattern: Relatively Dimensional

Fabric: Assorted solids and a Dr. Who print, all from Joann Fabrics, plus a coordinating fat quarter from Spoonflower for the text portions of the quilt

Dimensions: Roughly 50″ x 80″ (but it’s bigger on the inside)

Wibbly Wobbly Tardis Quilt

And from the gag reel of our outdoor photo shoot…

Wibbly Wobbly Tardis Quilt

My husband really does put up with a lot.

Gimli Costume–Actual Dwarven Size!

It’s been a while. So let’s get right down to catching up on the past year or so!

First up is the crown jewel of my projects for 2014: my son’s Halloween costume. He’ll soon be of an age where he’ll want to make his own costume choices, so until that point, I plan on having some fun. Say hello to Gimli from Lord of the Rings.

Gimli Toddler Costume

It all started with a toddler-sized beard… When approaching a crazy project, I try to tackle the part most likely to fail — and the facial hair was the make or break for this costume. Fortunately I found a great tutorial — that I simply scaled down. I modified the finished beard to snap on to the helm with oversized snaps, as it was the part I figured he’d dislike the most. Spoiler alert — I was right.

Gimli Toddler Costume

Gimli Toddler Costume

From there, it was on to Gimli’s helm. I made changes to this free fleece knight helmet pattern, by adding chain mail-ish stitching on the back, as well as a medallion and cheek straps cut out of felt with my Silhouette Cameo. The designs were freehanded, and based loosely off of movie screenshots.

The tunic was based on Butterick 3244 — a simple fireman’s jacket. The sleeve pattern was chopped into a few pieces to get the look I was going for, and a faux chain mail underlayer was added.

Gimli Toddler Costume

The bandolier/belt was made from a few chopped up belts I found at the thrift store. I glued them together with industrial adhesive, then drilled holes and laced with decorative leather cord for extra reinforcement.

Gimli Toddler Costume

The treat bag is probably my favorite part. I traced a movie still of Gimli’s axe and cut it out of fusible web backed felt on my Silhouette. I created an offset around the original design and cut it out of another color of felt, then mounted the first on the second. It was reinforced with cardboard from a cereal box. I used a strip of felt to gusset the front and back together, and another thrift store belt for the handle.

Gimli Toddler Costume

Gimli Toddler Costume

Gimli Toddler Costume

He was a very good sport about the whole thing, and even wore the beard long enough for us to get a few good shots of the costume all together. For trick or treating and his school’s Halloween parade, he went sans facial hair — a good choice for everyone involved.

Gimli Toddler Costume

Gimli Toddler Costume

Gimli Toddler Costume

It was a great honor for this costume to be chosen as Craftster’s 2014 Costume Contest winner, as well as one of the Best of 2014 in the ‘Epic Challenge Winners of 2014’ category!

Gimli Toddler Costume

World of Warcraft Diaper Cake

It’s always an adventure exploring fandoms in diaper cake form, so I was excited to tackle a World of Warcraft themed cake for a friend whose wife is expecting their first baby this month. I kept it fairly small and simple, and hoped that he would ‘get’  it, even if no one else at the shower did. It was a hit!

World of Warcraft Diaper Cake

Like our Star Wars nursery and the Harry Potter diaper cake that I made a few years ago, I didn’t have much luck finding WoW baby items, so I made do with some DIY instead. Knowing nothing about this game meant that lots of research was required, from funny bib ideas right down to the exact fonts used in the game.

I used my embroidery machine digitize fonts and logos to make three custom bibs. Unfortunately I was in a rush and didn’t get a chance to take pictures before it was assembled. The first was a twist on the ubiquitous “Green Linen Shirt” available in the game.

World of Warcraft Diaper Cake

The second reads “Home is where the hearthstone is.”

World of Warcraft Diaper Cake

And lastly, “For the horde”!

World of Warcraft Diaper Cake

The plush murloc (an in-game baddie) was an eBay purchase. You really can find anything on the internet these days! Washcloth lollipops and travel sized toiletries rounded out the cake.

World of Warcraft Diaper Cake

Cellophane and a custom gift tag completed the presentation.

World of Warcraft Diaper Cake

Come one, come all!

People aren’t kidding when they say your child’s first year flies by. I feel like we just brought our baby boy home, but last weekend we celebrated his first birthday!

Any and all party planning credit needs to be split with Pinterest. I pinned the stuffing out of this party.

First up we have the birthday boy as a ringmaster, greeting guests at the door.

Elliott's Circus Birthday

Here’s the most finished shot I have of the party spread. Too busy enjoying myself to get a final picture! The canopy is from IKEA (MYSIG), as is the red striped fabric (SOFIA).

Elliott's Circus Birthday

The banner is made from scrapbook paper, white cardstock, and ribbon.

Elliott's Circus Birthday

Staples transformed raffle tickets into a festive chain garland.

Elliott's Circus Birthday

The marquee number one is made from posterboard, foam core board, and string lights that I already had. 

Elliott's Circus Birthday

I’m so happy with how the decorations turned out! Lots time spent during naps and after Elliott’s bedtime brought it all together.

Elliott's Circus Birthday

My mother in law made this beautiful and delicious cake for the occasion. I was blown away! Can you believe it was her first time ever working with fondant?

Elliott's Circus Birthday

These yellow carnation “popcorn” arrangements were one of my favorite details.

Elliott's Circus Birthday

Paper straws and daisy lids transformed canning jars I had on hand into glasses for the pineapple lemonade punch.

Elliott's Circus Birthday

The popcorn maker was borrowed from my parents. I made a mini popcorn bar with candy and savory snacks to mix in. Word to the wise – use coconut oil. It tastes like it came right out of a theater bucket!

Elliott's Circus Birthday

Popping action!

Elliott's Circus Birthday

I ran paper bags through our printer to make custom popcorn bags. Still can’t believe that worked! I was sure this was going to be a failed project.

Elliott's Circus Birthday

There’s chalkboard inspiration to be found all over Pinterest. Here’s my attempt, with black foam core board and metallic markers.

Elliott's Circus Birthday

Paired with polka dot balloons!

Elliott's Circus Birthday

I bought some circus-y clipart on Etsy and blew it up for decorations. Printed on cardstock, trimmed, and mounted on polka dot cardstock.

Elliott's Circus Birthday 

Elliott's Circus Birthday

I used the same clipart (and a Husqvarna Designer SE) to embroider a custom onesie for Elliott. The buttons and bowtie are repurposed from a teeny tiny tux he wore at four months to a black tie event.

Simple hand sewing is about the only thing I have energy for today #sickdaysewing

I think he looked smashing! And not just because he adorably slathered himself in cake.

Elliott's Circus Birthday

I even made a little party hat, which was soundly rejected by the guest of honor.

Elliott's Circus Birthday

Here’s the $2 photo booth backdrop I made from crepe paper and painter’s tape.

Elliott's Circus Birthday

We took photos with a camera on a tripod, and I used PhotoFunia’s photo booth tool to make the authentic-looking strips below.

Elliott's Circus Birthday Elliott's Circus Birthday Elliott's Circus Birthday

Elliott's Circus Birthday Elliott's Circus Birthday

All in all, a wonderful day with wonderful people. Happy birthday, Elliott!

Don’t Feed the Plant!

These days I’m happy to be busy mom-ing, but every now and then I get the chance to indulge in something crafty… mostly during naps and after bedtime! I managed to find time to make E his first Halloween costume this year.

My husband was good enough to make it a group costume! They went as Seymour and Audrey II from Little Shop of Horrors.

Audrey II & Seymour

For the body of the costume, I used a pair of pajamas that fits as a rough pattern. Everything is made of fleece.

Audrey II & Seymour

For the hat, I used McCall’s #6812 to start, then added leaves, lips, teeth, gums, and an elastic chin strap to help keep it on his little noggin.

Audrey II & Seymour

Inner workings of the hat.

Audrey II & Seymour

The treat bag is made from felt and decorated it with a fabric marker.

Audrey II & Seymour

E was a great sport walking around to a few neighbors. Mostly he got a kick out of hanging onto fun sized candy bars.

Audrey II & Seymour

Between the thrift store sweater vest, dollar store glasses, and fleece for the baby’s costume, we only spent around $25.

Audrey II & Seymour Audrey II & Seymour

Boo!

My little firecracker

It was July 2nd when I realized our little guy didn’t have a thing to wear on Independence Day. A quick trip for supplies, some craft time after his bedtime, and soon he had some custom threads to celebrate the birth of our nation.

Fourth of July Onesie

I cut into some freezer paper that’s been hanging around for years for the very first time. Kind of embarrassing!

I traced the design from Word the old fashioned way.Fourth of July Onesie

It took a lot of trimming to get it all cut out!

Fourth of July Onesie

A quick iron, and we were ready for paint. I used Tulip’s ‘Soft’ fabric paint.

Fourth of July Onesie

First blue…

Fourth of July Onesie

Then white… then overnight to dry. The stencil peeled off without any problems, and after a few quick touch ups, it was ready to wear.

Fourth of July Onesie

Of course, any craft project is improved with a pint-sized model.

Fourth of July Onesie

Especially a smiley one!

Fourth of July Onesie