The force is strong with this one…

After weeks of work, our little guy’s nursery is finally complete. And not a moment too soon: I’m due in a week, and we’ve already had one exciting (but baby-less) trip to the hospital. I couldn’t be happier with how it all came together. Without further ado… enjoy zillions of pictures of a tiny nursery in a galaxy far, far away.

Star Wars Nursery

Star Wars Nursery

Star Wars Nursery

Star Wars Nursery

Star Wars Nursery

Star Wars Toy Box from Andrea & Sonny

Star Wars Nursery

Star Wars Bunting

Star Wars Mobile

Star Wars Nursery

Star Wars Nursery

Star Wars Nursery

Light Saber Lamp

Star Wars Nursery

Star Wars Nursery

Star Wars Nursery

Star Wars Nursery

Star Wars Nursery

Star Wars Nursery

Star Wars Nursery

Star Wars Nursery

Star Wars Nursery

Star Wars Nursery

Star Wars Nursery

Star Wars Nursery

Star Wars Nursery

Star Wars Nursery

Star Wars Nursery

Star Wars Nursery

Paint: Martha Stewart Living Driftwood Gray, Home Depot

LED star ceiling kit: Weidamark

Crib: Baby Mod ParkLane

Changing table: IKEA Expedit with drawer and door inserts, legs, and knobs

Dresser: IKEA [discontinued]

Glider: Little Castle Crown Reclining Swivel Glider from Target

Paper lanterns: Plain from Luna Bazaar, Death Star from ThinkGeek [sold out]

Prints: James Hance, aswegoArts Etsy shop, some DIY

Frames: IKEA Ribba, assorted sizes

Mobile: DIY

Bunting: DIY

Quilt: DIY

Crib Skirt: DIY

Boppy Cover: DIY

Upholstered initial: DIY (might make a tutorial for this at some point…)

Changing pad cover / crib sheet: Land of Nod

Light saber lamp: DIY

Closet shelving: Rubbermaid HomeFree series closet kit

Curtains: DIY, fabric from Spoonflower

You’ve heard of the Leg Lamp…

How about a light saber lamp?

Light Saber Lamp

Another simple, inexpensive DIY project for the baby’s nursery. The light saber hilt is from my husband’s collection — just a cheapie plastic model. The lamp base is IKEA’s Hemma and the shade is Jara. Total cost? Just under $15.

Light Saber Lamp

This is my favorite kind of project: it doesn’t scream ‘STAR WARS’ on first look, but instead is a more of a subtle nod to the Jedi’s weapon of choice.

Want to make your own? Geek Crafts has a great tutorial on making one yourself. We used it mostly for inspiration and kinda winged the assembly.

In other news, I’ve finally settled on a fabric for the remaining big projects in the room. Current plan is for floor length curtains to replace the closet door, a roman shade for the window, and a simple pleated crib skirt.

72dpi-A-5976-B

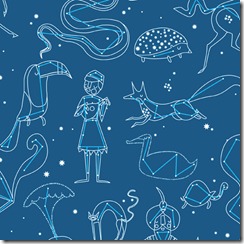
The print is ‘Constellation’ by Lizzy House. Isn’t is cute? It’s so new that it hasn’t even been released yet. I can’t wait to get my hot little hands on it. There will be some furious sewing going on in early December so that everything is ready for the bambino’s arrival.

Showered With Love

A few weeks ago, my mom and sisters threw an amazing owl-themed baby shower to celebrate the upcoming arrival of our son. It was a great party, with wonderful guests and a liberal dose of crafted decor and details.

It seems that a few of our guests got into the handmade spirit as well. I was touched to receive some items lovingly made just for our little bambino.

First up is a sweater from my best friend from my days at Penn State. Not only is it adorable in its own right (elbow patches! teeny pockets! shawl collar! Squee!)… It’s all the more special to me because I taught her how to knit back in our dorm days.

Gramps Sweater from Abbey

Can you believe this is her first finished sweater? I was blown away.

Gramps Sweater from Abbey

Next is a suite of blue baby gifts knitted and crocheted by the mother of another close friend. The matching sweater, hat, and booties are too cute!

Sweater Set

Soon to be filled by little feet…

Booties Close Up

She also made a beautiful crocheted blanket, which has already taken up residence in the nursery.

Crocheted Blanket

Last up is a huge surprise from my twin sister and brother-in-law. They’re well aware of my obsession with James Hance’s ‘Wookie the Chew‘ line that is dominating the nursery decor. They picked a few of my favorite prints and wood burned them onto a toy box. Here’s the front…

Star Wars Toy Box from Andrea & Sonny

…the top…

Star Wars Toy Box from Andrea & Sonny

…one side…

Star Wars Toy Box from Andrea & Sonny

…the back…

Star Wars Toy Box from Andrea & Sonny

…and the other side. They left it unstained as yet so that we could pick a shade to match the room.

Star Wars Toy Box from Andrea & Sonny

I can’t get over this lovely toy box. Such a clever idea, and I’m amazed by the work and craftsmanship that went into it. It is the perfect finishing touch for the room. I know our little guy will cheerfully stuff his toys inside for years to come!

Star Wars Bunting

Like many on the East Coast, I was lucky enough to have off of work today to weather out the storm at home. I set a goal for the day of making something for the baby’s room out of only supplies I had lying around the house… Starting with this big pile of felt scraps.

Pile 'O Felt

After a lot of trimming, here we are on our way to bunting for the nursery.

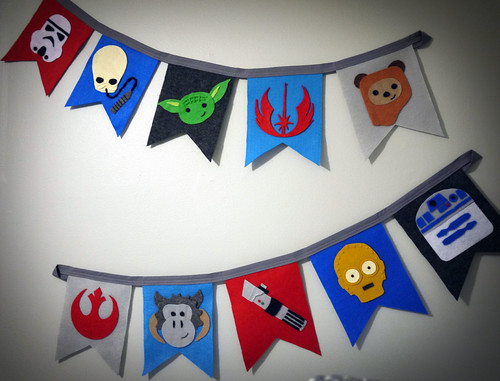
Star Wars Bunting

Trying out a layout, prior to gluing…

Star Wars Bunting

I had planned to do a good bit of embroidery on each piece, but I actually like it a little more simple.

From the top: storm trooper, Cantina band member, Yoda, Jedi symbol, Wicket the Ewok, rebel alliance symbol, tauntaun, lightsaber, C3PO, and R2D2 bringing up the rear.

Star Wars Bunting

The binding is actually left over from a quilt I made last April. This is why I don’t throw anything away!

Star Wars Bunting

There’s still a lot of work to do, but it’s really exciting to see a few things coming together in the room.

Star Wars Bunting

Twinkle Twinkle

I love Pinterest. Where else would I find an idea as crazy as this?

If you can look past my awful video skills, this is the major project we’ve been working on for our little guy’s nursery.

So how’d we do it? First, we bought a kit. Then we pored over the internet, looking for people who had already attempted this project. We got a lot of tips and tricks that saved us time and effort throughout the process.

This is fairly early on in the installation, and the scariest part. We randomly drilled 288 holes from the attic down into the baby’s room. No turning back now!

Nursery Star Ceiling

A lot of people have asked if we included specific constellations, but honestly, it seemed like a lot of extra work on top of an already insurmountable task. Also, it could be argued that it’s an authentic view of the night sky from Kashyyyk or Naboo or something. Yeah, let’s stick with that.

The little doohickies sticking out of the ceiling are toothpicks. After drilling the holes, we realized we’d have to paint the ceiling… something we had hoped to avoid. So Ben did the rolling and I followed behind, faithfully plugging holes to keep them from filling up with paint.

Nursery Star Ceiling

Working from the back of the room — furthest from the light source in the attic — and moving towards the front, Ben passed the fiber optic strands down from the attic to me one by one. I knotted them into groups to keep things a little less unruly. This was the most time consuming part of the project.

Nursery Star Ceiling

The dangling fibers made for some neat pictures.

Nursery Star Ceiling

Slowly we worked our way through the room, threading fiber down from above. Each fiber was secured from the attic with a dollop of regular ‘ol Aleene’s Tacky Glue.

Nursery Star Ceiling

Here’s a peek at the attic during the process. Note the cable management system employed by my highly organized better half. You can also see the light source that makes the whole operation run. It comes with two internal ‘wheels’ that you can switch out. One makes the stars twinkle, and one makes them rotate through a few different colors.

Nursery Star Ceiling

Once all of the fibers were threaded, the last step was to clip each fiber to 1/8" inch from the ceiling. No special tool here — just a regular pair of snips with felt taped to the ends to get a 1/8" length.

Nursery Star Ceiling

Even my husband, who may not have shared my enthusiasm while hunched over in the attic for a solid week, seems very happy with the results. Let’s just say that we won’t be applying this treatment to any *other* rooms in our house… and if we’re in this house in 2043, our 30 year old son will still be enjoying his star ceiling! [Or else.]

Nursery Star Ceiling

If you’re interested in installing your own starfield ceiling, the kit that we used can be purchased from Weidamark. We got ours from their eBay store, where the kit and the shipping were both slightly cheaper.

A Mobile Fit for a Jedi

As you can imagine, it’s not easy to find accessories for a Star Wars themed nursery. Bring on the DIY! My latest project was a repurposed mobile.

Star Wars Mobile

A long time ago, in a galaxy far far away, it looked like this:

Mobile, Before

I took it apart and measured the fabric pieces that came with it, making patterns and using leftover fabric from the R2D2 quilt to ‘reupholster’ the arms and hanger.

Then, I freehanded a felt Death Star to glue over the round mechanism up top.

Star Wars Mobile, Death Star

Sadly, it does not play the Imperial Death March – ‘Lullaby’ will have to do. BUT, the little plushes that I bought on eBay to hang from the arms make their own noises when you squeeze them. Chewwie roars, R2D2 beeps, Yoda pontificates, and Vader breathes heavily… Jawa’s eyes even light up! So still pretty cool.

Each character is attached with embroidery floss, a decorative button, and a generous gob of hot glue.

Star Wars Mobile, Yoda

Star Wars Mobile, Darth Vader

Star Wars Mobile, Chewbacca

Star Wars Mobile, R2D2

Star Wars Mobile, Jawa

This is not the quilt you’re looking for

What on earth… ?

R2D2 Folded

Ok, here’s a hint or two. (Bonus points if you know what the guy on the right is.) Still not sure?

R2D2 and Rancor

Beep boopboop beep.

R2D2 Baby Quilt

This is the first project for our little padawan’s Star Wars themed nursery!

Dimensions: 36” x 48”

Fabrics: Calicos and solids from JoAnn Fabrics

Pattern: I wish! Made up as I went along.

There’s a whole lot happening on the front, so I decided to keep the back very basic. Love this Denyse Schmidt dot print from JoAnn Fabrics.

R2D2 Baby Quilt

Originally  I wanted to embroider the back by hand, but after finishing the first word I wasn’t fully happy with it. Instead, I used my machine’s basic zigzag stitch. It’s a little wonky, but I think that adds to the charm.

R2D2 Baby Quilt Embroidery

I’m really happy with how this quilt finished up, and it’s given me a lot of confidence in our unconventional choice of theme.

R2D2 Baby Quilt

Here’s a few pictures of the process. Basically I printed up a bunch of pictures and winged it from there.

R2D2 Progress

It’s been a long time since I made something up from scratch, and it was a bit of a struggle. Apparently my version of ‘pregnancy brain’ is a complete inability to properly use fractions. Lots of ripping out, lots of re-cutting… but worth it in the end!

R2D2 Progress

I love this picture: inspiration in the upper right, and carnage in the lower right.R2D2 Progress

Off to work on the next nursery project! I have a feeling that this is going to be a lot of fun…